Computer Tutorials | Infotech | Software | Games | Ebook | Tips & Trick Blogger


Showing posts with label Blogger. Show all posts

Cara Membuat Page Numbering With CSS3 Effect

Cara Membuat Page Numbering With CSS3 Effect - Hadir kembali menyuguhkan tutorial blogspot nih. Page Numbering adalah sebuah menu yang wajib kamu pasang di blog. Apalagi blog kamu sudah memiliki ratusan postingan, wajib banget. Sebab, dengan memasang Page Numbering maka pengunjung akan lebih mudah melihat postingan lama mu. Untuk Demo nya bisa liat pada gambar berikut. Dijamin keren deh, dan ada CSS3 nya, sehingga blog kamu akan lebih friendly. Mau coba? Ikuti deh yang satu ini

Page Numbering With CSS3 Effect

Cara Membuat Page Numbering With CSS3 Effect
1. Login ke blogger.com
2. Klik Rancangan --> Edit HTML, cari kode ]]></b:skin> dan masukkan kode berikut ini diatasnya :
.showpageArea a {
text-decoration: underline;
}

.showpageNum a {
border-bottom-right-radius: 8px;
border-top-left-radius: 8px;
border: 1px solid gray;
margin: 0pt 3px;
padding: 3px;
text-decoration: none;
}

.showpageNum a:hover {
background: none repeat scroll 0% 0% red;
border-bottom-right-radius: 8px;
border-top-left-radius: 8px;
border: 1px solid #B6CFEA;
}

.showpagePoint {
background: none repeat scroll 0% 0% red;
border-bottom-right-radius: 8px;
border-top-left-radius: 8px;
border: 2px solid white;
color: gold;
margin: 0pt 3px;
padding: 3px;
text-decoration: none;
}

.showpageOf {
margin: 0pt 3px 0pt 0pt;
padding: 3px;
text-decoration: none;
}

.showpageArea a {
text-decoration: underline;
}

.showpageNum a {
border-bottom-right-radius: 8px;
border: 1px solid gray;
margin: 0pt 3px;
padding: 3px;
text-decoration: none;
}

.showpageNum a:hover {
background: none repeat scroll 0pt 0pt #B6CFEA;
border-bottom-right-radius: 8px;
border-top-left-radius: 8px;
border: 1px solid #B6CFEA;
}

.showpagePoint {
background: none repeat scroll 0pt 0pt #B6CFEA;
border-bottom-right-radius: 8px;
border-top-left-radius: 8px;
border: 2px solid white;
color: white;
margin: 0pt 3px;
padding: 3px;
text-decoration: none;
}

.showpageOf {
margin: 0pt 3px 0pt 0pt;
padding: 3px;
text-decoration: none;
}

.showpage a {
border-bottom-right-radius: 8px;
border-top-left-radius: 8px;
border: 2px solid gray;
padding: 3px;
text-decoration: none;
}

.showpage a:hover {
background: none repeat scroll 0% 0% red;
border-bottom-right-radius: 8px;
border-top-left-radius: 8px;
border: 1px solid #B6CFEA;
text-decoration: none;
}

.showpageNum a:link, .showpage a:link {
color: thistle;
text-decoration: none;
}

3. Setelah itu silahkan cari kode </body> dan tempatkan kode berikut ini diatasnya :
<!--Page Navigation Starts-->
<script type='text/javascript'>
var home_page=&quot;/&quot;;
var urlactivepage=location.href;
var postperpage=4;
var numshowpage=5;
var upPageWord =&#39;Prev&#39;;
var downPageWord =&#39;Next&#39;;
</script>
<script src='http://javascript16.googlecode.com/files/4jiepagenumbering.txt' type='text/javascript'/>
<!--Page Navigation Ends -->

4. Simpan

Cara Membuat Gambar Bergetar Saat Disorot

Cara Membuat Gambar Bergetar Saat Disorot - Pada tutorial kali ini, kami akan bagikan cara membuat gambar bergerak saat disorot. Awalnya sempat kepikiran untuk membuat logo header yang bisa bergetar saat kursor menyorot kearah header. Tapi, dikarenakan ada beberapa faktor, kami tidak jadi memasangnya. Ada 2 versi getaran, yang pertama Getaran TingTing dan satu lagi Getaran Ngebor. Nah, berikut ini cara untuk membuatnya :

Getaran TingTing


<center><img class="gambargetar" onclick="top.focus()" onmouseout="stoprattle(this);top.focus()" onmouseover="init(this);rattleimage()" src="https://blogger.googleusercontent.com/img/b/R29vZ2xl/AVvXsEjxiDRESzN_Ceh0DjslSK0WutNJrvkArqV4Skg5N1fDsNuYavCAlShZgwEPktYpLcwCAoQhzy_tGV-ePKutNVs_BGeSRX9fOipynSFL7mvi70oZbjMA_BHWEW-nzF3Sk05qVwuyvQ7UTSE7/s1600/blogger+(1).png" /></center><style>
.gambargetar{position:relative}
</style><script src="https://sites.google.com/site/fajrialhadii/javascript/GetarTingTing.js" type="text/javascript">
</script>

Getaran Ngebor


<center><img class="gambargetar" onclick="top.focus()" onmouseout="stoprattle(this);top.focus()" onmouseover="init(this);rattleimage()" src="https://blogger.googleusercontent.com/img/b/R29vZ2xl/AVvXsEjxiDRESzN_Ceh0DjslSK0WutNJrvkArqV4Skg5N1fDsNuYavCAlShZgwEPktYpLcwCAoQhzy_tGV-ePKutNVs_BGeSRX9fOipynSFL7mvi70oZbjMA_BHWEW-nzF3Sk05qVwuyvQ7UTSE7/s1600/blogger+(1).png" /></center><style>
.gambargetar{position:relative}
</style><script src="https://sites.google.com/site/fajrialhadii/javascript/GetarNgebor.js" type="text/javascript">
</script>

Salin kode diatas dan tempatkan di Rancangan -> Tambah Gadget -> HTML/JavaScript --> Save

Cara menampilkan hanya Judul Posting di Homepage

Cara menampilkan hanya Judul Posting di Homepage - Panduan Blogger kali ini kami akan membahas cara menampilkan hanya judul posting di homepage. Mungkin kalian pernah melihat sebuah blog yang pada homepage / halaman depan / beranda blognya hanya tampak judul postingannya saja. Dengan hanya menampilkan judul posting di homepage blog kita, maka kita bisa menghemat ruang sehingga kita bisa menampilkan banyak posting di homepage / halaman depan blog kita.


Bagi kalian yang ingin mencoba cara ini, silahkan ikuti langkah-langkah berikut ini :
  1. Login ke blogger.com, masukkan akun dan password mu
  2. Pilih Rancangan --> Edit HTML
  3. Masukkan kode dibawah ini sebelum </head> 
  4. <style type='text/css'> <b:if cond='data:blog.pageType != &quot;item&quot;'> <b:if cond='data:blog.pageType != &quot;static_page&quot;'> .post-body{display:none;}</b:if> </b:if> </style>
  5. Simpan 

Mengenali Beragam Karakter Blogger

"Lain ladang lain belalang, lain lubuk lain pula ikannya" mungkin peribahasa itulah yang bisa mengambarkan perbedaan karakter individu yang memiliki beragam sifat dan tingkah laku.  Juga seperti halnya belalang dan ikan, blogger memiliki gaya dan ciri khas dalam mengarungi dunia perbloggeran.


Pada kesempatan kali ini, kami akan membahas mengenai beragam karekter yang ada pada diri seorang blogger. Langsung saja berikut ini adalah beberapa rincian karakter seorang blogger:

Personal
Dari judulnya saja personal dapat ditebak kalau blogger satu ini konten atau artikelnya berisi mengenai informasi pribadi sang pemilik blog. Mulai dari biodata diri, pengalaman pribadi, curahan hati, sampai kegiatan harian semuanya tersaji lengkap dari mulai bangun tidur sampai tidur lagi.

Blogger Purba
Blogger jenis ini biasanya membuat blog sekedar iseng-iseng atau cuma pengen tahu rasanya punya blog. Setelah jadi, blog dilupakan begitu saja ibarat kata "habis manis sepah dibuang". Parahnya lagi, tidak ada posting pula. Blogger seperti inilah yang  meninggalkan jejak fosil-fosil blog yang ujung-ujungnya hanya jadi sampah. Tapi kita harus tetap menghargainya, karena setiap orang memiliki hobi yang berbeda.

Klik-Hunter
Nah kalo blogger ini lain lagi, kalau orang tua dulu bilang "sambil menyelam minum air" artinya: sambil ngeblog dapet dollar. Wajar-wajar saja jika uang adalah tujuan seorang blogger. Namun, jika kita menemui tipe Hyper Ads,  mungkin kita juga akan kesal karena dari header, sidebar, footer, sampai disela sela artikel disisipkan iklan. Kalo bisa pembaca disuruh baca iklan biar peluang kliknya lebih besar. Kalau masih kurang , biasanya pada saat mau masuk halaman blog juga ada iklan melayang, diklik 2x baru bisa hilang.

Informer
Yang ini baru jempolan, isi konten berupa media informasi. Entah itu informasi teknologi, kesehatan, blogging, internet atau apapun yang penting bermanfaat bagi pembaca. Lebih jempol lagi kalau niatnya tulus berbagi informasi tanpa ada niat komersil. Blogger seperti inilah yang sering mendapatkan tanggapan positif dari pembaca.

Rangking Hunter
Ini blogger pasti hobinya blogwalking, tukeran link, dan meninggalkan jejak berupa komentar di situs orang lain. Tujuannya sangat jelas untuk mendapat banyak backlink dan berharap mendongkrak rangking blog.

SEO Focus
Blogger yang ini pasti up to date terhadap perkembangan dunia SEO. Mulai dari template, meta tag, pagespeed, dan lain-lain dirombak sampai mencapai kata sempurna. Tapi memang paling enak kalau berkunjung ke blog yang sudah SEO. Mulai dari templatenya yang enak dilihat, struktur konten yang teratur sampai loadingnya yang cepat membuat pengunjung ingin balik lagi.

Sekarang Anda dapat menerka-nerka mana karakter yang mendekati kepribadian Anda. Bisa jadi lebih dari satu karakter. Saya sendiri berharap memiliki karakter blogger yang informatif, SEO, dan mendapatkan pendapatan dari blogging.

Pengertian & Manfaat Dummy Blog

Apa Itu Dummy Blog ? 

Pengertian Dummy Blog
Dummy Blog adalah suatu blog yang mendukung terhadap blog utama. Kita bisa membuatnya dengan memanfaatkan blog gratis seperti wordpress, blogspot, atau mywapblog dengan menanam backlink. yang intinya blog tersebut mengarah pada blog utama kita.

Skema Dummy Blog
SKEMA DUMMY BLOG

Manfaat Dummy Blog
Manfaat Dummy Blog adalah mencari perhatian google bahwa banyak situs yang menuju ke artikel kita, sehingga kemungkinan besar, posting kita pun akan berada di posisi yang baik dalam search engine. Dari sekian banyak panduan seo dari master, mereka juga berpendapat bahwa kita juga harus memperhatikan konten yang relevan dengan blog utama, serta PR atau pagerank dari blog dummy . Dan antar dummy blog yang satu dengan yang lainnya saling terkait dan mengarah ke blog utama. Nah, buat yang pengen menguatkan  posisi postingannya di Search Engine, silahkan coba gunakan Dummy Blog dengan bijak.

Membuat Semua Link Terbuka di Tab Baru

Membuat Semua Link Terbuka di Tab Baru - Link pada suatu blog atau website sangat penting gunanya,yaitu agar pembaca tetap memiliki akses terhadap page referral di mana dia menemukan link baru untuk di-klik. Selain itu, bagi pemilik blog/website hal ini juga menguntungkan karena visitor tidak segera meninggalkan halaman blog/website karena adanya window baru yang harus dibuka.


Membuat Semua link terbuka di tab baru

Selain itu, link terbuka di tab baru pada artikel yang sedang dibaca juga tidak menghilang tergantikan oleh halaman baru dari link yg di-klik oleh visitor. pembaca tetap dapat membaca artikel hingga selesai sambil melihat referensi link yg terdapat di dalam posting.

 Berikut ini cara  Membuat Semua Link Terbuka di Tab Baru :

  1. Login ke menu bloger
  2. klik Dashboard
  3. Pilih Rancangan
  4. Pilih Edit Laman
  5. Tambahkan Gadget/Add Gadget => HTML/JavaScript
  6. Lalu Copy Script berikut
    <!-- code for turning all non-blog links to new page links -->
    <script type="text/javascript" language="javascript">
    var arr = document.getElementsByTagName("a"); //get all links inthe page
    for(var i = 0; i < arr.length; i++)
    {
    if(arr[i].href.indexOf(" http://sumberbacaan.blogspot.com/ ") < 0 //not links that are 'inside' blog
    && arr[i].href.indexOf("javascript:") < 0) //not javascript links
    arr[i].target = "_blank";
    }
    </script>
  7. Ganti Tulisan berwarna merah tersebut dengan URL blog kamu lalu Jangan Lupa di Save
Demikian Cara Membuat Semua link terbuka di tab baru, semoga bermanfaat.

Membuat Header Menjadi Dua Bagian

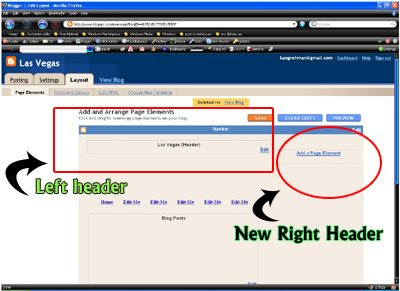
Membuat Header Menjadi Dua Bagian - Header blog sangat penting, disamping untuk mempercantik blog, header biasanya berisi tentang judul blog serta deskripsi blog, dan bahkan header bisa berfungsi untuk menempatkan iklan juga.


Membuat Header Dua Bagian

Berikut ini cara membagi header menjadi dua bagian :

  1. Login ke account blogger kalian
  2. Klik rancangan
  3. Klik Edit HTML
  4. Bisa Download Template Lengkap jika khawatir gagal
  5. Sekarang cari kode CSS seperti yang mirip beikut:
    /* Header
    ----------------------------------------------- */
    #header-wrapper {
    width:930px;
    margin:0 auto 10px;
    border:1px solid $bordercolor;
    }
    #header-inner {
    background-position: center;
    margin-left: auto;
    margin-right: auto;
    }
    #header {
    margin: 5px;
    border: 1px solid $bordercolor;
    text-align: center;
    color:$pagetitlecolor;
    }
  6. Ganti kode diatas dengan kode dibawah ini:
    /* Header
    ----------------------------------------------- */
    #header-wrapper {
    width:930px;
    margin:0 auto 0px;
    background:#ffff;
    height:180px;
    }
    #header-one {
    width:50%;
    background-position: left;
    margin-left: auto;
    margin-right: auto;
    float:left;
    }
    #header {
    margin: 0px;
    text-align: left;
    color:$pagetitlecolor;
    }
    #header_two{
    width:50%;
    float:left;
    padding-top:10px;
    }
    Perhatikan kode yang berwarna merah pada bagian awal, sesuaikan lebar atau angka width dengan lebar header template sobat.
  7. Sekarang cari kode seperti berikut:
    <div id='header-wrapper'>
    <b:section class='header' id='header' maxwidgets='1' showaddelement='no'>
    <b:widget id='Header1' locked='true' title='Tempat Eksperimen Kecil (Header)' type='Header'/>
    </b:section>
    </div>
  8. Setelah menemukan kode diatas, sisipkan kode warna merah berikut dengan penempatan yang menyarupai contoh dibawah ini:
    <div id='header-wrapper'>
    <div id='header-one'>
    <b:section class='header' id='header' maxwidgets='1' showaddelement='no'>
    <b:widget id='Header1' locked='true' title='Tempat Eksperimen Kecil (Header)' type='Header'/>
    </b:section>
    </div>
    <div id='header_two'>
    <b:section class='header' id='header2' preferred='yes'/>
    </div>
    </div>
  9. Klik Simpan Template
  10. Selesai


Untuk melihat hasil, klik elemen halaman, jika tampilan header sobat-sobat sekalian serupa screenshoot diatas, berarti kamu berhasil. Silahkan isi kolom baru dengan ragam widget atau ads.

Cara Membuat Emoticon Di Blog Secara Otomatis

Yang kami maksud dengan Cara Membuat Emoticon Di Blog Secara Otomatis adalah memasang emoticon atau smile pada postingan blog secara otomatis hanya kita mengetikkan simbolnya maka nanti akan tampil gambar emoticon yang kamu inginkan, terkadang jika kita menulis kita ingin memberi sebuah emosi secara tertulis, nah jika hanya menggunakan simbol-simbol smile atau emoticon namun tanpa gambar maka emosi pada tulisan kamu akan kurang hidup.

Cara Memasang Emoticon Di Blog
Ikuti tutorialnya dibawah ini :

  1. Login ke blogger kamu.
  2. Klik Rancangan/design.
  3. Klik edit HTML.
  4. Copy paste kode berikut dan letakkan tepat dibawah kode ]]></b:skin>
    <script src='http://louislim2.googlepages.com/addSmiley.js ' type='text/javascript'/>
  5. Lalu simpan template kamu.


Icon smile ini akan tampil secara otomatis pada blog kita setiap kali kita mengetikan standar kode dari icon tersebut.

Standar kode smile yang bisa digunakan :

:) or :-)
:D or :-D
:$ or :-$
:( or :-(
:p or :-p
;) or ;-)
:k or :-k
:@ or :-@
:# or :-#
:x or :-x
:o or :-o

Silahkan test dengan mengetikkan simbol-simbol diatas, lalu postinglah. maka simbol-simbol yang kamu tulis tadi akan otomatis jadi gambar emoticon.

Trik Ampuh Memasang Meta Tag SEO

Trik Ampuh Memasang Meta Tag SEO - Bicara tentang SEO memang tidak ada habisnya, mulai dari trik murni sampai trik curang dilakukan agar web/blog tetap berada di posisi teratas Search Engine. Nah, pada kesempatan kali ini kami akan share tentang Trik Ampuh Memasang Meta Tag SEO. Memang sih sudah banyak yang ngebahas tentang Trik ini, tapi dicoba dulu. Sebab, dengan mengoptimasi Meta Tag dapat membuat blog/web kamu kebanjiran pengunjung. Nah, Meta Tag yang kami bagikan ini untuk blog dengan engine blogspot. 

Berikut langkah-langkah Trik Ampuh Memasang Meta Tag SEO :

  • Login ke Blogger
  • Lalu silahkan pilih Rancangan .
  • Kemudian edit HTML.
  • Centang Expand Widget Template.
  • Download Template Lengkap (sebagai back up).
  • Lalu cari kode berikut <b:include data='blog' name='all-head-content'/>
  • Kemudian silahkan copy dan letakkan kode meta tag berikut persis dibawah kode diatas.

<b:if cond='data:blog.url == data:blog.homepageUrl'>
<title><data:blog.pageTitle/></title>
<meta content='DESKRIPSI BLOG' name='DESCRIPTION'/>
<meta content='KEYWORD BLOG' name='KEYWORDS'/> </b:if>
<b:if cond='data:blog.pageType == &quot;item&quot;'>
<title><data:blog.pageName/></title>
<meta expr:content='data:blog.pageName + &quot;, &quot; + data:blog.title + &quot;, &quot; + data:blog.pageName' name='Description'/>
<meta expr:content='data:blog.pageName + &quot;, &quot; + data:blog.title + &quot;, &quot; + data:blog.pageName' name='Keywords'/>
</b:if>
<meta content='index, follow' name='robots'/>
<meta content=' NAMA PENGGUNA BLOG ' name='author'/>
<meta content='2012, JUDUL BLOG ' name='copyright'/>
<meta content='1 days' name='revisit-after'/>
<meta content='id' name='language'/>
<meta content='id' name='geo.country'/>
<meta content='Indonesia' name='geo.placename'/>
<meta content='all-language' http-equiv='Content-Language'/>
<meta content='global' name='Distribution'/>
<meta content='global' name='target'/>
<meta content='Indonesia' name='geo.country'/>
<meta content='all' name='robots'/>
<meta content='all' name='googlebot'/>
<meta content='all' name='msnbot'/>
<meta content='all' name='Googlebot-Image'/>
<meta content='all' name='Slurp'/>
<meta content='all' name='ZyBorg'/>
<meta content='all' name='Scooter'/>
<meta content='ALL' name='spiders'/>
<meta content='text/html; charset=UTF-8' http-equiv='Content-Type'/>
<meta content='true' name='MSSmartTagsPreventParsing'/>
<meta content='blogger' name='generator'/>
<meta content='general' name='rating'/>
<meta content='never' name='Expires'/>

  • Simpan

Cara Membuat NewsTicker/Berita Berjalan Keren

Cara Membuat NewsTicker/Berita Berjalan Keren - Newsticker atau berita berjalan bisa kita buat agar blog kita tampil lebih keren, disamping itu berita berjalan atau newsticker bisa ditampilkan dari recent post blog kita, dan akhirnya pembaca pun bisa melihat apa saja berita terbaru dari blog kita. Lihat gambar dibawah ini!


Dari gambar diatas mungkin sudah banyak yang tahu kalo itu mirip dengan newsticker dari gaya template sporty magazine 2 dari borneo template. Karena memang banyak yang suka dengan gaya tersebut maka saya akan share pada teman-teman blogger yang lain bagaimana cara membuatnya.

Untuk Membuat Newsticker/berita berjalan keren seperti mirip sporty magazine 2 ikuti langkah-langkah dibawah ini:
  1. Login ke blogger/blogspot kamu.
  2. Klik Rancangan atau design.
  3. Klik edit HTML.
  4. Beri ceck / centang pada kotak yang berada pada pojok template kamu.
    Dan jangan lupa download template kamu untuk berjaga-jaga agar jika terjadi kesalahan bisa dibackup.
  5. Cari kode ]]></b:skin> dan copy paste kode berikut dan letakkan tepat diatas kode ]]></b:skin>
    Code :

    /* News Ticker Wrapper */
    .newspic {background:#000 url(https://blogger.googleusercontent.com/img/b/R29vZ2xl/AVvXsEhjhP7oByEE3a1dwcqx69kWPCS3xxyUiUSk6xI96jnR2mmZm-EKNwgJ8xIlvYPq5vEkCblM8TiCDTy-HfdLH3Z-FRAlSZo_f0ymCTsxtatG58kjG4WoHukVUv85c7rW1DOGTbQxxZayCOo/s1600/headline.png) no-repeat top left;width:940px;margin:0 auto;padding:0 auto;height:28px;color:#ff0000;}
    .news {width: 940px;margin:0 auto;padding:0 auto;line-height: 1.4em;text-align:left;font-family:Arial;font-size:11px;color:#fff;overflow:hidden;clear:both;}
    .news a:link{color:#ff0000;font-weight: bold;text-decoration:none}
    .news a:visited{color:#ddd;font-weight: bold;text-decoration:none}
    .news a:hover{color:#fff;font-weight: bold;text-decoration:underline}

  6. Lalu Cari Lago kode </head> dan letakkan kode berikut tepat diatas kode </head>
    Code :

    <script src='http://www.google.com/jsapi?key=ABQIAAAA4qkT5i26SQ6NmgJd5KQemhRQ_a6zv5_Bim3H_GL4gaueIFZ15xRdt8jcAUk8ZHokIVo-TBZgYVbkzw' type='text/javascript'/>
    <script type='text/javascript'>
    //<![CDATA[
    var gfeedfetcher_loading_image="indicator.gif";google.load("feeds","1");function gfeedfetcher(c,a,b){this.linktarget=b||"";this.feedlabels=[];this.feedurls=[];this.feeds=[];this.feedsfetched=0;this.feedlimit=5;this.showoptions="";this.sortstring="date";document.write('<div id="'+c+'" class="'+a+'"></div>');this.feedcontainer=document.getElementById(c);this.itemcontainer="<li>"}gfeedfetcher.prototype.addFeed=function(b,a){this.feedlabels[this.feedlabels.length]=b;this.feedurls[this.feedurls.length]=a};gfeedfetcher.prototype.filterfeed=function(b,a){this.feedlimit=b;if(typeof a!="undefined"){this.sortstring=a}};gfeedfetcher.prototype.displayoptions=function(a){this.showoptions=a};gfeedfetcher.prototype.setentrycontainer=function(a){this.itemcontainer="<"+a.toLowerCase()+">"};gfeedfetcher.prototype.init=function(){this.feedsfetched=0;this.feeds=[];this.feedcontainer.innerHTML='<img src="'+gfeedfetcher_loading_image+'" /> INFONETGUE';var a=this;for(var b=0;b<this.feedurls.length;b++){var c=new google.feeds.Feed(this.feedurls[b]);var d=(this.feedlimit<=this.feedurls.length)?1:Math.floor(this.feedlimit/this.feedurls.length);if(this.feedlimit%this.feedurls.length>0&&this.feedlimit>this.feedurls.length&&b==this.feedurls.length-1){d+=(this.feedlimit%this.feedurls.length)}c.setNumEntries(d);c.load(function(e){return function(f){a._fetch_data_as_array(f,e)}}(this.feedlabels[b]))}};gfeedfetcher._formatdate=function(a,c){var d=new Date(a);var b=(c.indexOf("datetime")!=-1)?d.toLocaleString():(c.indexOf("date")!=-1)?d.toLocaleDateString():(c.indexOf("time")!=-1)?d.toLocaleTimeString():"";return"<span class='datefield'>"+b+"</span>"};gfeedfetcher._sortarray=function(a,b){var b=(b=="label")?"ddlabel":b;if(b=="title"||b=="ddlabel"){a.sort(function(e,d){var g=e[b].toLowerCase();var f=d[b].toLowerCase();return(g<f)?-1:(g>f)?1:0})}else{try{a.sort(function(e,d){return new Date(d.publishedDate)-new Date(e.publishedDate)})}catch(c){}}};gfeedfetcher.prototype._fetch_data_as_array=function(b,a){var d=(!b.error)?b.feed.entries:"";if(d==""){alert("Google Feed API Error: "+b.error.message)}for(var c=0;c<d.length;c++){b.feed.entries[c].ddlabel=a}this.feeds=this.feeds.concat(d);this._signaldownloadcomplete()};gfeedfetcher.prototype._signaldownloadcomplete=function(){this.feedsfetched+=1;if(this.feedsfetched==this.feedurls.length){this._displayresult(this.feeds)}};gfeedfetcher.prototype._displayresult=function(a){var e=(this.itemcontainer=="<li>")?"<ul>\n":"";gfeedfetcher._sortarray(a,this.sortstring);for(var c=0;c<a.length;c++){var d='<a href="'+a[c].link+'" target="'+this.linktarget+'" class="titlefield">'+a[c].title+"</a>";var b=/label/i.test(this.showoptions)?'<span class="labelfield">['+this.feeds[c].ddlabel+"]</span>":" ";var g=gfeedfetcher._formatdate(a[c].publishedDate,this.showoptions);var f=/description/i.test(this.showoptions)?"<br />"+a[c].content:/snippet/i.test(this.showoptions)?"<br />"+a[c].contentSnippet:"";e+=this.itemcontainer+d+" "+b+" "+g+"\n"+f+this.itemcontainer.replace("<","</")+"\n\n"}e+=(this.itemcontainer=="<li>")?"</ul>":"";this.feedcontainer.innerHTML=e};
    var gfeedfetcher_loading_image="indicator.gif";function gfeedrssticker(d,b,a,c){this.tickerid=d;this.delay=parseInt(a);this.mouseoverBol=0;this.itemsperpage=1;this.messagepointer=0;gfeedfetcher.call(this,d,b,c);this.itemcontainer="<div>";this.tickerdiv=document.getElementById(d)}gfeedrssticker.prototype=new gfeedfetcher;gfeedrssticker.prototype.constructor=gfeedrssticker;gfeedrssticker.prototype._displayresult=null;gfeedrssticker.prototype.entries_per_page=function(a){this.itemsperpage=a};gfeedrssticker.prototype._signaldownloadcomplete=function(){this.feedsfetched+=1;if(this.feedsfetched==this.feedurls.length){this._initscroller(this.feeds)}};gfeedrssticker.prototype._initscroller=function(a){var c=this;gfeedfetcher._sortarray(a,this.sortstring);this.itemsperpage=(this.itemsperpage>=a.length)?1:this.itemsperpage;var b=a.slice(this.messagepointer,this.itemsperpage);this.tickerdiv.innerHTML=formatrssmessage(b,this.showoptions,this.itemcontainer,this.linktarget);this.tickerdiv.onmouseover=function(){c.mouseoverBol=1};this.tickerdiv.onmouseout=function(){c.mouseoverBol=0};this.messagepointer=this.itemsperpage;if(window.attachEvent){window.attachEvent("onunload",function(){c.tickerdiv.onmouseover=c.tickerdiv.onmouseout=null})}setTimeout(function(){c._rotatemessage()},this.delay)};function formatrssmessage(d,b,f,g){var c=(f=="<li>")?"<ul>\n":"";for(var e=0;e<d.length;e++){var h='<a href="'+d[e].link+'" target="'+g+'" class="titlefield">'+d[e].title+"</a>";var j=/label/i.test(b)?'<span class="labelfield">['+d[e].ddlabel+"]</span>":" ";var k=gfeedfetcher._formatdate(d[e].publishedDate,b);var a=/description/i.test(b)?"<br />"+d[e].content:/snippet/i.test(b)?"<br />"+d[e].contentSnippet:"";c+=f+h+" "+j+" "+k+"\n"+a+f.replace("<","</")+"\n\n"}c+=(f=="<li>")?"</ul>\n":"";return c}gfeedrssticker.prototype._rotatemessage=function(){var b=this;if(this.mouseoverBol==1){setTimeout(function(){b._rotatemessage()},100)}else{var a=this.feeds.slice(this.messagepointer,this.messagepointer+this.itemsperpage);this.tickerdiv.innerHTML=formatrssmessage(a,this.showoptions,this.itemcontainer,this.linktarget);this.messagepointer=(this.messagepointer+this.itemsperpage>this.feeds.length-1)?0:this.messagepointer+this.itemsperpage;setTimeout(function(){b._rotatemessage()},this.delay)}};
    //]]></script>

  7. Dan langkah terakhir Peletakkan kode HTML untuk newstickernya, kamu bisa meletakkan ditempat yang kamu inginkan. dan disini sebagai contoh saya akan meletakkanya dibawah menu navigasi horisontal. silahkan cari kode <div id='navigation'> dan setelah kode <div id='navigation'> ditutup dengan kode </div> letakkan kode berikut tepat dibawah kode </div>
    Code :

    <div class='newspic'>
    <div class='news'>
    <div style='float:left;padding:5px 60px 5px 7px;font:bold 14px Arial;color:#333;text-transform:none;'>
    Berita Terbaru :
    </div><div style='float:left;width:680px;padding:4px 0; position:relative; overflow:hidden;'>
    <script type='text/javascript'>
    var cssfeed=new gfeedrssticker(&quot;example1&quot;, &quot;example1class&quot;, 4000, &quot;_new&quot;)
    cssfeed.addFeed(&quot;Sabar Muanas&quot;, &quot;http://infonetgue.blogspot.com/feeds/posts/default&quot;) //Specify &quot;label&quot; plus URL to RSS feed
    cssfeed.displayoptions(&quot;date&quot;) //show the specified additional fields
    cssfeed.setentrycontainer(&quot;div&quot;) //Wrap each entry with a DIV tag
    cssfeed.filterfeed(10, &quot;date&quot;) //Show 10 entries, sort by date
    cssfeed.entries_per_page(1)
    cssfeed.init()
    </script>
    </div>
    </div><div style='clear:both;'/>
    </div>


    Ganti URL berwarna merah dengan URL blog kamu.
  8. Nah, Sekarang simpan template kamu.
Keterangan:
Kode menu navigasi berbeda-beda, jika tidak menemukan kode pada nomor 7 coba kamu cari kode <div id='content-wrapper'> dan letakkan kode HTML newsticker (yang ada pada nomor 7 ) letakkan tepat diatas kode <div id='content-wrapper'>

Demikian cara membuat newsticker / berita berjalan keren, jika kamu berhasil maka akan ada berita terbaru dari recent post blog kamu yang bergerak atau berubah-ubah layaknya yang ada pada template gaya sporty magazine 2.

Download Mozilla Firefox terbaru (versi 10.0.1)

Browser Mozilla Firefox merupakan salah satu browser internet yang lumayan banyak dipakai para user penjalajah dunia maya atau internet. Mozilla baru-baru ini merilis versi terbarunya yaitu Firefox 10.0.1. Tampilan yang minimalis serta realistis, memudahkan para pengguna untuk menggunakannya sebagai alat penjelajah yang patut diacungi jempol. Mozilla versi-versi terbaru ini mendukung untuk terpasangnya video Calling Facebook.

Bagi teman-teman yang belum mempunyai koleksi browser yang satu ini (versi baru) silahkan segera download dan install di PC/Laptop kamu.

DOWNLOAD FIREFOX 10.0.1 KLIK DISINI untuk download via mediafire

Untuk yang mau download versi sebelumnya yaitu Mozilla Firefox 9.0.1 bisa klik link berikut :

Threaded Comments Fitur Baru System Komentar Blogger

Ini dia yang ditungg-tunggu bagi para Blogger Mania, seperti kita ketahui selama ini bahwa blogger tidak atau belum mendukung system kotak komentar Threaded Comments atau Trackback system (kotak komentar seperti wordpress) tetapi sekarang Blogger telah mendukung system kotak komentar tersebut. Walaupun dulu waktu belum mendukung kita bisa menggunakan Disqus Comments yang memungkinkan merubah system kotak komentar blogger menjadi System Threaded atau trackback tetapi cara tersebut sedikit rumit rasanya apalagi bagi yang baru memulai blogging.

Nah sekarang kita bisa membuat system komentar Trackback atau Threaded Comments dengan sangat mudah, akan tetapi cara ini tidak akan berfungsi atau tidak akan berjalan pada kode system komentar yang sudah dimodifikasi? Trus bagaimana solusinya? Solusinta yaitu dengan mengembalikan "Kode Widget Template Ke Default" berikut cara merubah menjadi Threaded Comments:


Tutorial dibawah ini menggunakan gambar blogger tampilan baru jadi silahkan rubah dulu blog kamu ke tampilan baru supaya tidak membingungkan caranya, cukup login dan lihat bagian atas lalu klik "Try the updated Blogger interface" atau "Coba antar muka Blogger Baru" maka tampilan akan berubah ke tampilan dasboard baru.

Jangan lupa juga untuk membackup template terlebih dahulu (untuk mengantisipasi yg tidak diinginkan)
 
Ada dua cara untuk membuat Threaded Comments ini :
- Threaded Comments dengan Edit Kode
- Threaded Comments tanpa Edit Kode

1. Threaded Comments dengan Edit Kode
Saya sarankan gunakan yang ini agar tampilan posting tidak terpengaruh.

1. Masuk ke halaman Dasboard klik tanda panah dan klik "Template" :


Sekali lagi saya ingatkan untuk membackup template dengan mengklik tombol "Backup / Restore"

2. Klik "Edit HTML" 


- Jika muncul  sebuah peringatan berikut klik  "Proceed"


3. Akan terlihat kode script template kamu. Klik  "Expand Widget Template"


4. Kemudian carilah kode dibawah ini. gunakan Ctrl + F pada keyboard untuk memudahkan pencarian:


 <b:include data='post' name='comments'/>

5. Terdapat 4 kode seperti diatas, ganti kesemua-4 kode tersebut diatas dengan kode dibawah ini

<b:if cond='data:post.showThreadedComments'>
<b:include data='post' name='threaded_comments'/>
<b:else/>
<b:include data='post' name='comments'/>
</b:if>

5. Jika ke 4 kode yang saya maksud pada langkah (4) diatas telah diganti semua Klik "Save Template" / "Simpan Template"

Sekarang lihat hasilnya, tapi mungkin tampilannya masih kurang menarik karena masih bawa'an untuk tampilan yang lebih menarik silahkan tunggu tutorial berikutnya saya akan membuat Tampilan / Style untuk Threaded Comments ini.

2. Threaded Comment Tanpa Edit Kode 
Saya lebih menyarankan menggunakan cara 1 karena langkah 2 akan mempengaruhi tampilan posting area blog.

1. Masuk ke halaman Dasboard klik tanda panah dan klik "Template" :


Sekali lagi saya ingatkan untuk membackup template dengan mengklik tombol "Backup / Restore"

2. Klik "Edit HTML" 


- Jika muncul sebuah peringatan klik  "Proceed"


3. Akan terlihat kode script template kamu. Klik  "Revert widget templates to default"


4. Kemudian klik "OK" maka script untuk widget akan dikembalikan kesemula

5. Silahkan lihat hasilnya dan test tampilan komentar kamu yang baru.
6. Jika perubahan template mempengaruhi Halaman Judul Posting dan Post meta dll kamu bisa sedikit merubahnya melalui Halaman Pengaturan atau juga bisa dengan mengedit Template.

Sampai disini kamu sudah berhasil merubah kotak komentar lama dengan System Threaded Comments tetapi dengan tampilan yang masih bawa'an atau standar kamu bisa memodifikasi kode CSSnya.

Cara Membackup Template Blogger

Cara Membackup Template Blogger - Membackup template, hal yang penting dalam urusan blogging tetapi banyak juga yang mengabaikannya. Membackup template akan sangat membantu kita ketika kita melakukan Edit atau melakukan perubahan pada blog kita dan saat itu juga terjadi kesalahan pada blog kita sendiri, dengan demikian kita memiliki salinan template yang masih bagus atau belum memiliki kerusakan pada Script walaupun nantinya tidak terjadi kesalahan kita sudah berusaha mengantisipasinya.

Membackup template sangatlah mutlak perlu dilakukan sebelum kita melakukan perubahan atau bereksperiment pada blog kita, atau kita bisa membuat blog baru khusus untuk percobaan apabila tidak ingin melakukan Backup Template.

Berikut sebuah Tutorial Sederhana Membackup Template Blogger. tutorial dibawah ini menggunakan tampilan baru silahkan rubah dulu blog kamu ke tampilan baru :

1. Silahkan masuk ke blogger
2. Klik Tanda Panah >> lalu Klik Template atau Layout


3. Cari dan Klik Tombol "Backpup / Restore" (dibagian kanan atas)


4. Pada jendela yang baru yang muncul Klik tombol "Download Full Template"


5. Unduh template dan simpanlah pada komputer kamu dan klik "Close"

Mungkin suatu saat kamu membutuhkan template hasil backup tersebut jadi simpanlah template blogger kamu. Cara yang sangat mudah bukan,,,? jadi jangan sampai hal ini dilewatkan jika suatu saat ingin melakukan edit atau melakukan perubahan Script pada template kamu.

7 Motives for Creating a Blog

There are many reasons for people creating a blog and these motives are normally established early on in the life of the blogging platform itself. There are many who have an interest in starting their own site but are unsure of the best way to format the delivery of their blog content. The concerns are what is it people like to see and what may be some of the more popular styles the top bloggers use. Well since blogging requires time and commitment there needs to be a passion or motive that drives you and if this is the case your reasons will dictate how you deliver your blog content. If a passion does not exist the life expectancy of you site will likely not be very long!

With that said here are 7 of the most common reasons many people establish their own blogging platform which may perhaps spark an idea for you as well!

1. To Inform

Depending upon the niche you have selected some people are 'news junkies' who find gratification in breaking the news to others. This type of blog content is appreciated by those who use the internet as their primary source of news.

2. To Educate

Learning something new about anything ranging from passions, interest or perhaps even a current project is a common reason why many search the internet. By sharing your expertise and/or new found knowledge in a particular field with others is a terrific way to build a following and one in which there is always a need!

3. To Inspire

In the age of self improvement or self help making available a source of inspiration to others is another popular area for both bloggers and people in search of inspiring content. Many top bloggers regardless of their fields of interest will periodically dedicate some of their efforts to creating inspirational material for their readers to view. Who out there is not in need of inspiration at one time or another?

4. To Entertain

Another field that attracts a broad cross-section of viewers is entertainment. Whether it is humor, music, movie reviews or celebrity reporting this is an area many focus upon when developing their blog content. Seeking out various forms of entertainment is a needed outlet for most and a demand that is both strong and constant.

5. To Persuade

This would typically be a business blog where the motive is to earn an income, which is a very strong motive indeed! Persuasion is used more than promoting when a blogging platform is used for marketing purposes since relationship building is a bloggers primary objective.

The political arena is also able to make effective use of blogs as well for sending out their messages to loyal constituents.

6. To Share Opinions

Whether it is sharing or seeking opinions this is an interest that reaches to almost every human being. Think about it, who does not have an interest in what others may think on a particular subject or the desire to share their own opinions instead?

7. To Update

Many special interest groups or industry watchdogs make great use of the blogging platform to keep people up to date on current news or changes. Much like political blogs these platforms serve also as rallying grounds for others who share the same interests!

As you have seen there are many reasons people have for creating a blog and in most cases these reasons are strong. Since maintaining a blogging platform takes plenty of time and commitment it seems that it helps to have a natural interest or enthusiasm for what you write about. As is the case with most of the top bloggers, this enthusiasm or passion tends to be reflected in the blog content itself thereby making it for a more interesting read. In the majority of cases the way people deliver their content is dictated by their reasons for even blogging. 7 of the most common motives that drive many of the top bloggers are discussed above and can be used for just about any niche imaginable. The lesson here is that it is not so much your style of delivery that will make you popular but the degree of passion you have for what you write about!

5 Essential Guest Blogger Plugins For Your Blog

There are many blogs that have been started by individuals which may not be getting the attention they deserve. Most likely this is due to the fact that they are not making use of the tools that are available for maximizing blogs.

Here is a look at 5 essential guest blogger plugins for your blog that will make it easier to integrate with the world of social media.

1. Twitter

If you have a Twitter account, it can be integrated into the blogging site. This way your followers can keep up with your tweets and they can be kept up to date on new posts. There are a number of buttons that can be used to show readers what you said on Twitter. This creates a highly interactive atmosphere visitors. The same is true for Facebook.

2. Facebook
 
Facebook is another popular social media outlet that connects people from all over the world. One can use the Facebook Like button to integrate with their blog. As visitors see this they can click on the like button if they are a member. This also helps to make your presence known on this popular site.

3. Google Buzz

Google Buzz is another way to gain more readers to a blog. This tool allows you to connect with those who use this service. It allows people to share pictures and messages which can be done publicly or privately. If you want lots of readers to visit the blog post however, it is best to go public about it.

4. Sociable
 
Sociable is a plugin that has all of the most popular social bookmarking sites. It links all of the posts to these sites and in some cases it can be done automatically. This makes it easier to integrate the blogging site to bookmarking sites instead if doing this by hand every time you make a new post. It also gives others a chance to do the same.

5. ShareThis

ShareThis is similar to sociable but it also has a feature that allows readers to send emails of the post to their friends. Sociable only has bookmarking sites whereas ShareThis has bookmarking sites plus other social media sites listed here. This provides the reader with a variety of options to share information with others.

A few of the social media sites mentioned also have plugins to help with integration as well. This makes it easier to communicate with those who are following your blog already or might help you to gain new readers. Facebook is one example that allows one to share videos and connect with other bookmarking sites. All of this helps to make blogging highly effective.

How to Increase Your Website Traffic Rankings Using Social Media Marketing

There are plenty of ways you can use social media to market your products or services online. I would stay away from MySpace unless you're in the entertainment industry. Outside of that, Facebook is the best choice.

Stay away from Twitter unless you are doing multiple promotions or frequent updates. I still can't figure out all the hype with Twitter, although I'm currently using Twitter - go figure!

Linked In is good for networking with like minded business people. You can answer and ask questions. Answering questions at Linked In will establish credibility, trust, likability and you can be perceived as an expert in your field. Doing this can allow you to build relationships that may lead to joint venture partnerships. So, no matter your market, join Linked In.

Join forums that cater to your market. This is a good way to get you and your product in front of the people who matter most, your target group! Just go to Google and type your "keyword" followed by "forum and message boards" and see what comes up. I can bet your bottom dollar there's a forum for your target group!

YouTube is good too! Okay the simple way to make videos for YouTube is to write a 300-500 word article. Record your voice as you read the article out load. If you have Microsoft open Movie Maker and add your recording and then add pictures that compliment your recording and you have a video slide show to upload to YouTube. If you use a Mac just open up iMovie to make your YouTube videos.

You can also create Squidoo lenses and HubPages. These sites are good for doing affiliate product reviews, product comparisons or simply doing a tutorial of your own products or even your affiliate products. The reason I like Squidoo and HubPages is because Google loves them! Their pages get indexed quickly in Google.

There are all kinds of other methods like social bookmarketing, RSS feedsScience Articles, blogging and podcasting just to name a few. Just simply pick which methods will work for you TODAY and stick with your plan.

All about Dynamic Views for Readers (Blogger)

Blogger currently offers five dynamic views for its public blogs. These views are only accessible if allowed for by the blog author.

* Flipcard: available at [blogURL]/view/flipcard
* Mosaic: available at [blogURL]/view/mosaic
* Sidebar: available at [blogURL]/view/sidebar
* Snapshot: available at [blogURL]/view/snapshot
* Timeslide: available at [blogURL]/view/timeslide

As an example, the URL for accessing the Sidebar view for Blogger Buzz would be http://sumberbacaan.blogspot.com/view/timeslide

These views require modern browsers such as Internet Explorer 8+, Firefox 3.5+, Chrome or Safari. Many elements of these views will not work should you have an older browser.
In all views, search is available in the upper right hand corner. Clicking on the ">" arrow in the very top left of the header bar will slide the header bar across and allow you to choose different views for the current blog as well as type in a new blog URL.
There is also a feedback link for each view.

Flipcard


  • Mouse over any of the cards to see the post title and comment count. As you scroll down, additional posts will continue to load.
  • Click on a card to see the post in full view. You can navigate through the posts using J (older post) and K (newer post) or the arrow keys. Hit escape or click Back to all posts to return to the Flipcard view.
  • In the upper left, click to sort by Date, Author and Category.

Mosaic


  • Clicking on an individual tile will expand that post to the full width of the view, and clicking again will collapse the post back into its original position.
  • The exact position of the tiles is randomly determined each time the blog loads, but they will appear chronologically from top left to bottom right.
  • Once a tile is expanded, you can page down by using the "up" and "down" arrow keys as well as J and K.
  • This view is optimized for the tablet viewing, and supports screen rotation.

Sidebar


  • Optimized for quick reading and browsing.
  • Left sidebar is list of chronological posts, with comment counts and thumbnails for individual posts.
  • J and K arrow keys will navigate through the posts, and comments can be displayed on the same page by clicking the Show link.

Snapshot


  • This view will display only the posts which have images.
  • Clicking through any photo will display the full post page, with naviagtion links at the bottom for Newer and Older posts
  • Mousing over any photo will display a post snippet

Timeslide


  • This view breaks the blog content down into three different areas:
    • Left column: Enlarged picture with a post snippet, title, and snipppet displayed in chronological order
    • Middle column: Displays just the post title and snippet
    • Right column: Displays just the individual post titles
  • When searching for posts in this view, the results will be highlighted.

Cara Membuat Kotak Text Area

Text area dimaksudkan untuk menampilkan text yang dikehendaki pada suatu tempat di blog Anda. Text area memiliki banyak fungsi yang salah satunya bisa digunakan untuk menuliskan alamat sebagai tukar backlink. Namun, selain itu masih banyak kegunaan text area sesuai dengan kebutuhan masing-masing sehingga bisa dimodifikasi sesuai dengan keinginan.

Berikut adalah code untuk membuat kotak text area :
<textarea cols="20" name="code" rows="3"> Masukkan teks disini </textarea></div>

Berikut tampilannya :


Dan jika Anda ingin menempatkan kotak text area di posisi tengah, kiri atau kanan kita tinggal menambahkan kode <p align="center"> (untuk posisi di tengah) atau <p align="right"> (untuk posisi di sebelah kanan) sebelum penulisan kode text area

Contoh untuk penempatan di tengah :
<p align="center"><textarea cols="20" name="code" rows="3"> Masukkan teks disini </textarea></div>

Tampilannya sebagai berikut :

Cara Membuat Tulisan Berkedip

Tulisan berkedip biasanya dipakai pemilik blog untuk tujuan agar pengunjung mengklik tulisan tersebut dan didalamnya biasanya di alihkan ke suatu URL atau alamat blog tertentu. Cara membuatnya cukup sederhana, yaitu tinggal menambahkan script <blink> dan ditutup dengan </blink>

Contoh :
<blink>Tulisan Berkedip</blink>

Hasilnya :
Tulisan Berkedip

Selamat mencoba...

Menampilkan Menu Pop Up pada Blog

Menu Pop Up merupakan sejenis widget melayang yang penampilnnya muncul ketika blog Anda dibuka. Agar tidak mengganggu, menu tersebut telah dilengkapi dengan tombol close. Sehingga setelah pengunjung membaca isi dari menu tersebut dapat menutupnya kembali.

Isi dari menu pop up dapat digunakan untuk menampilkan iklan atau apa saja berupa hal-hal yang penting anda sampaikan kepada pengunjung sebelum pengunjung itu membuka blog secara penuh.

Berikut langkah-langkah membuatnya :

1. Login ke Blogger.
2. Masuk ke Rancangan pilih Edit HTML.
3. Cari kode ]]></b:skin>
4. Copy kode dibawah ini kemudian paste tepat diatasnya

#topbar{
position:absolute;
visibility: hidden;
width: 350px;
z-index: 100;
padding:5px;
background-color: #FFFFFF;
border: 1px solid #333333;
-moz-border-radius: 6px;
-webkit-border-radius: 6px;
margin:0 auto 10px;
float:left;
color: #505050;
text-align: justify;
font-size: 12px;
font-family: Verdana, serif;
}

5. Copy kode dibawah ini, kemudian paste tepat dibawah kode </head>

<script src="http://sites.google.com/site/epgstudiosite/javascript/pop_up.js" type="text/javascript"></script>
<script type="text/javascript">
var persistclose=0
var startX = 20
var startY = 20
var verticalpos="fromtop"
</script>

6. Copy kode dibawah ini, kemudian paste tepat diatas kode </body>
 
<div id="topbar">
<div align="right"><a href="" onclick="closebar(); return false"><img src="http://sites.google.com/site/epgstudiosite/image/Close.png" /></a></div>


Masukan isi dari menu pop up yang ingin anda tampilkan


</div>


7. Klik tombol Simpan Template, sekarang lihat blog anda

Menu pop up dapat juga anda tampilkan dengan cara berikut ini :

1. Masuk ke Rancangan pilih Elemen Halaman
2. Klik Tambah Gadget
3. klik tanda + pada HTML/Javascript
4. Copy kode dibawah ini, kemudian paste pada kolom yang tersedia

<style type="text/css">
#gb{
position:fixed;
top:10px;
z-index:+1000;
}
* html #gb{position:relative;}
.gbcontent{
float:right;
border:2px solid #000000;
background:#ffffff;
padding:10px;
}
</style>
<script type="text/javascript">
function showHideGB(){
var gb = document.getElementById("gb");
var w = gb.offsetWidth;
gb.opened ? moveGB(0, 30-w) : moveGB(20-w, 0);
gb.opened = !gb.opened;
}
function moveGB(x0, xf){
var gb = document.getElementById("gb");
var dx = Math.abs(x0-xf) > 10 ? 5 : 1;
var dir = xf>x0 ? 1 : -1;
var x = x0 + dx * dir;
gb.style.top = x.toString() + "px";
if(x0!=xf){setTimeout("moveGB("+x+", "+xf+")", 10);}
}
</script>
<div id="gb">
<div class="gbtab" onclick="showHideGB()"> </div>
<div class="gbcontent">
<div style="text-align:right">
<a href="javascript:showHideGB()">
.:[Close][Klik 2x]:.
</a>
</div>
<center>

Masukan isi menu pop up disini

</center>
<script type="text/javascript">
var gb = document.getElementById("gb");
gb.style.center = (30-gb.offsetWidth).toString() + "px";
</script></div></div>

5. Klik tombol Simpan.
6. Lihat blog anda sekarang.