Everybody loves to watch videos to be entertained and feel happy. But it becomes an annoying situation when some commercial ads are played before movies or unwanted scene comes in a video. In this case, a video editor can let you get rid of unwanted contents. You can create and share your screen sensations with the world. You can make your own action flicks, funny clips or video memories effortlessly. Looking for reliable video editing software need not be a daunting task, but you should have an all-in-one video manager. In this article you’ll find top 10 video editors that can be used by beginners as well as savvy users for editing videos to a better output.
35 Online Photo Editing Websites To have Fun

There are a lot of online resources available where You can change, enhance and make funny photo editing without knowing and program like Photoshop. Maybe You want to be on magazine cover, want Your own personalized dollar or maybe just want to change Your mood? Now You can do it with just few mouse clicks and in few seconds.
Download Yahoo Messenger YM 11 Offline Installer
There a few feature in this YM 11, such as can be integrated with Facebook, come with new skin and more. This version of yahoo messenger also can be integrate with Yahoo! Pulse, and Twitter.
How To Make Google+ Look Like Facebook
If you were lucky enough to have received in invite for Google+, you’re probably trying to figure out how to customize it. What if you made the new social network look like Facebook? Thanks to a browser add-on known as Stylish, that’s possible.

All you’ll need is to be using Firefox or Chrome and 5 minutes of your time. Soon, you’ll have Google+ look convincingly similar to Facebook. Sorry, Opera and Internet Explorer users, this won’t work on your browser yet. Here’s how you do it.
Download PC Games: Harry Potter and the Order of the Phoenix

Tips on Enhancing the Speed of Your Laptop
Are you experiencing significant sluggishness in your laptop speed? If yes then there can be numerous reasons behind the same. If you want to find the remedy them proper diagnosis is essential.
Most of the times Windows registry issues are the cause of laptop slowdown. Your registry can be clogged because of continuous installing as well as uninstalling of software. Computer repair professionals suggest the speeding up of laptop by cleaning the registry. This might require a good tool or manual removal of entries. Manual intrusion is not recommended until you yourself are deft with PC repair.Only an experienced computer repair expert can help you with core registry issues.
Most of the times Windows registry issues are the cause of laptop slowdown. Your registry can be clogged because of continuous installing as well as uninstalling of software. Computer repair professionals suggest the speeding up of laptop by cleaning the registry. This might require a good tool or manual removal of entries. Manual intrusion is not recommended until you yourself are deft with PC repair.Only an experienced computer repair expert can help you with core registry issues.
If your registry is perfectly fine, viruses can be the culprit. In such cases good anti-viruses are indispensible. Installation of the latest version of anti-spyware can make your laptop free from all kinds of spyware and trojans. PC repair service professionals advise laptop users to be careful as spyware can be easily installed using a legitimate software.
Internet Explorer is found to be quite susceptible to the installation of spyware hence other browsers such as Google Chrome and Mozilla can be opted instead of the same. These browsers can easily import your IE favorites when you install them.
In all cases you should always ensure that your anti-viruses, anti-spyware, firewall, etc. are up-to-date and performing so that your laptop is secure from all kinds of virus and trojan intrusions. Moreover you should also be careful in not opening any unknown attachments or links.
In order to enhance the performance you can disable the systray applications. Since every icon runs in the PC memory it can be disabled in order to make your computer run faster. Items listed in the start-up can also be reduced in order to increase the performance of the laptop.
Computer repair service professionals also recommend scan disk function in order to check your laptop for any kind of errors. This checks your drives for various kinds of file system errors and then corrects them. After the machine returns from the scan disk in the same region you can execute defrag or 'disk defragmentation'. The defragmentation process will physically align the files in the best possible manner in your hard drive.
If you still feel your laptop is not giving you its best, it could be the RAM issue. Help from PC repair professionals can also be taken to ensure that your PC gets the best treatment.
Source: Article Click
Toshiba AC100 Netbook First Android Based, Battery Hold Up SEVEN DAYS!

Smartbook Toshiba AC100 Toshiba AC100 is the Toshiba AC100′s first netbook that runs on Android 2.1, Android 2.1 exactly , and resulted in the design is sleek and modern netbooks with battery run time up to eight hours of use, or standby mode / standby during the SEVEN DAYS to say netbook with the most lasting battery long for This moment for standby mode.
Yep, seven days, do not be surprised. This netbook runs on NVIDIA Tegra chip 250, with 512MB of DDR2 RAM, and 8GB NAND flash memory, SD / MMC card reader and 1.3MP webcam with microphone will allow you to use video-chat. With Tegra then This netbook also can play 1080p video when plugged into a TV full HD. This capability will make you satisfied when running applications or play your multimedia files.
Toshiba AC100 This running the Android 2.1 eclair, has 10.1-inch TruBrite display with LED-backlighting, and a resolution of 1024 x 600 px. It weighs 870g, and has only one USB port and a miniUSB, but there’s also an HDMI port for connection to a TV. Bluetooth, Wi-Fi and 3G are also optionally included. Toshiba AC100 sold with the price $ 438 to $ 548
Toshiba AC100 This running the Android 2.1 eclair, has 10.1-inch TruBrite display with LED-backlighting, and a resolution of 1024 x 600 px. It weighs 870g, and has only one USB port and a miniUSB, but there’s also an HDMI port for connection to a TV. Bluetooth, Wi-Fi and 3G are also optionally included. Toshiba AC100 sold with the price $ 438 to $ 548
Lenovo ThinkPad X301 27763PU 13.3-Inch

The Lenovo ThinkPad X301 notebook achieves a new benchmark of excellence in the unrivaled legacy of Think brand innovations – a breakthrough, full-featured business ultraportable that forces none of the compromises typical of other ultraportable systems. Business travelers, meet your new everywhere companion. Technophiles, meet your new object of desire. The X301 advances ultraportable computing offering smart design and cutting-edge technology in the thinnest full-featured ThinkPad notebook ever made. It's the ultimate business tool.
Features and Specs:
1.6GHz Intel SU9600 Core 2 Duo Processor
2 GB Memory; Intel WiMAX/WiFi Link 5150 (AGN 1 x 2)
128 GB Solid State Drive; Ultrathin DVD Burner; Integrated camera; Integrated Bluetooth wireless; Integrated fingerprint reader
13.3-in WXGA+ TFT (1440 x 900) LED backlight, Mobile Intel GS45 Express chip set; Mobile Intel GMA 4500 MHD
Genuine Windows Vista Business; 6-Cell Extended Li-Ion Battery
Download Digital Aquarium Screensaver

Digital aquarium screensaver is a unique screensaver that will bring the underwater world to your computer screen. You can tickle fish and feed fish. The small fish grow up after eating food. Click anywhere on the water and you will begin seeing ripples, the fish themselves will also create their own ripples once the ripples hits them. You can set the quantity of fish, camera focus, fog density, light intensity, waves sound, and bubble count. The screensaver allows you to set your desktop background as aquarium. If you want an aquarium you never have to clean, then this is the screensaver for you.
Features:
* 25 speciies of fish
* 3 colorful backgrounds
* Desktop background as aquarium
* Tickle fish and watch fish twist
* Feed fish and watch fish eat
* Small fish grow up after eating food
* Water ripple effect
* Adjust the camera focus
* Adjust the fog density
* Adjust the light intensity
* Adjust the waves sound
* Adjust the bubble count
* Lock the foreground colors
* Lock the background colors
* modify the foreground colors
* modify the background colors
* Show/Hide water
* Show/Hide lights
* Show/Hide terra
* Bubble music
* Compatible with Windows 7(32 and 64 bit)
* Save current setting
* Free technical support
* Free updates of minor versions
Download: Demo Digital Aquarium Screensaver
 Buy from digiaquascr
* 25 speciies of fish
* 3 colorful backgrounds
* Desktop background as aquarium
* Tickle fish and watch fish twist
* Feed fish and watch fish eat
* Small fish grow up after eating food
* Water ripple effect
* Adjust the camera focus
* Adjust the fog density
* Adjust the light intensity
* Adjust the waves sound
* Adjust the bubble count
* Lock the foreground colors
* Lock the background colors
* modify the foreground colors
* modify the background colors
* Show/Hide water
* Show/Hide lights
* Show/Hide terra
* Bubble music
* Compatible with Windows 7(32 and 64 bit)
* Save current setting
* Free technical support
* Free updates of minor versions
Download: Demo Digital Aquarium Screensaver
Buy from digiaquascr
Download Zoner Photo Studio 13 Free
Zoner Photo Studio 13 now available for free, Innovative graphics software company Zoner Software has announced the release of a new version of its standalone Zoner Photo Studio FREE, now based on Zoner Photo Studio 13.
This popular and easy-to-use one-stop photo toolkit for managing, editing and sharing photos now benefits from many features new to Zoner Photo Studio 13.

Key features:
• Powerful photo management and archiving.
• 64-bit version
• Direct upload to Facebook, Flickr and Picassa Web Albums
• Get photos from camera, scanner, memory card or screen
• Quick fix photos with the help of "Quick fix"
• Save time with easy batch operations
• Easily create 3D panoramas and photos
• A set of editing tools, and additional effects
• Add photos to the GPS coordinates of their creation and display location on the map
• Helps to quickly and easily publish images on the site
• Templates for calendars, greeting cards, etc.
Download: Zoner Photo Studio 13
This popular and easy-to-use one-stop photo toolkit for managing, editing and sharing photos now benefits from many features new to Zoner Photo Studio 13.

Take full control of your digital photos, using software Zoner Photo Studio. Get photos from your camera, scanner, or just the screen has never been so easy yet. Have fun organizing, sorting and search your digital photos.With the program, you can change and make more personal your photos with special effects. Amaze your family and friends with 3D photos and impressive panoramas!
Key features:
• Powerful photo management and archiving.
• 64-bit version
• Direct upload to Facebook, Flickr and Picassa Web Albums
• Get photos from camera, scanner, memory card or screen
• Quick fix photos with the help of "Quick fix"
• Save time with easy batch operations
• Easily create 3D panoramas and photos
• A set of editing tools, and additional effects
• Add photos to the GPS coordinates of their creation and display location on the map
• Helps to quickly and easily publish images on the site
• Templates for calendars, greeting cards, etc.
Download: Zoner Photo Studio 13
About Google+
Google+ (Plus) is one social network launch by project google at 28 June 2011. Big war between social network google+ and facebook will start now. And whois the winner? It one way google work out for take over big popular Facebook. At before, google has launch Google Wave and Google Buzz but get less respone from people.

According to An institute survey in the United States, Ancestry.com, reported that there were as many as 4.5 million users who use the service google plus. “Nearly 5 million” said Paul Allen, founder of ancestry.com, in PCMag.

According to An institute survey in the United States, Ancestry.com, reported that there were as many as 4.5 million users who use the service google plus. “Nearly 5 million” said Paul Allen, founder of ancestry.com, in PCMag.
Google+ (Plus) Feature:
1. Circles. This function can be used to insert the names of friends into groups and users can share content with different formats in this circle of friends.
2. Hangouts. This is a conferencing service is more than two people with a video call.
3. Huddle. This service provides the groups in this network to send instant messages.
4. Sparks. This feature connects the individuals in this network to people who have the same interests towards something.
Google+ Project Quick Look Video
Google+ (Plus) at now still beta and for register need to invite from people or friend has been join. It’s because very hight interest person. For registration google+ you must have google account.
Google+ (Plus) can access from https://plus.google.com/
Lenovo ThinkPad X220 Review

Lenovo's ThinkPad X200 series has a long history of combining lightweight portability, epic battery life, and uncompromising performance. The 12.5-inch, $1,299 ThinkPad X220 offers a couple of new riffs on this familiar theme, including a 16:9 screen, an Intel 2nd Generation Core processor and a large textured clickpad.
The X220 was just introduced this month and represents Lenovo's latest ultraportable ThinkPad. Feature highlights include a 12.5" 1366x768 IPS display, a solidly built thin frame and starting weight of 3 pounds. The ThinkPad X series refresh is available in various configurations, from the Core i3-2310M all the way up to the high-end i7-2620M (the series fastest dual-core mobile processor). The ThinkPad X220 also includes a full-size keyboard and an all-new oversized touchpad with integrated mouse-click buttons.
Lenovo's ThinkPad X200 equipped with a dual-core Core i5-2520M clocked at 2.5GHz (four thread capable with Hyper-Threading). This processor packs Intel's new HD 3000 graphics core and has max TDP of only 35W. Other specs include 4GB of PC3-10700 DDR3, a Hitachi 320GB 7200RPM hard drive, Intel Centrino Advanced-N 6205 wireless, Bluetooth, a 6-cell Li-ion battery and as mentioned before a 12.5" IPS display.
Lenovo's ThinkPad X200 equipped with a dual-core Core i5-2520M clocked at 2.5GHz (four thread capable with Hyper-Threading). This processor packs Intel's new HD 3000 graphics core and has max TDP of only 35W. Other specs include 4GB of PC3-10700 DDR3, a Hitachi 320GB 7200RPM hard drive, Intel Centrino Advanced-N 6205 wireless, Bluetooth, a 6-cell Li-ion battery and as mentioned before a 12.5" IPS display.
Acer AC700 Chromebook 3G Review

Features:
- The Acer Chromebook is the future of computing. In a stylish simplified design with 11.6" HD display,
- With built-in WiFi and 3G it's easy to jump online from just about anywhere- airports, coffee shops and more!
- Your apps, documents, and settings are stored safely in the cloud.
- Chromebooks run the first consumer operating system designed to defend against the ongoing threat of malware and viruses.
- Your favorite websites load quickly and run smoothly, full support for the latest web standards and Adobe® Flash®.
- And no matter where you are, you can access all of your information and data since it?s stored online in the cloud.
- Chromebooks boot in 8 seconds and resume instantly.
- Even if you lose your computer, you can log into another Chromebook and get back to work.
- In fact, Chromebooks are designed to get faster over time as updates are released.
- It's the ideal device for users who live and breathe online.
- They employ the principle of "defense in depth" to provide multiple layers of protection.
- 11.6” HD Widescreen CineCrystal LED-backlit LCD: (1366 x 768) resolution, 16:9 aspect ratio
- Dual-core Intel Processor
- 2GB DDR3 Memory
- Intel Graphics Media Accelerator 3150
- 1.3 Megapixel HD Webcam (1280 x 1024)
- High-Definition Audio Support
- Two Built-in Speakers
- 802.11b/g/n Wi-Fi CERTIFIED
- Built-in 3G Wireless
- 2- USB 2.0 Ports
- 1- HDMI™ Port
- Full-sized Chrome Keyboard with dedicated keys for the web
- Oversized, Multi-touch Touchpad
- Memory card slot for storing photos, music, and video
- 6 hours of continuous use
- .3.3 lbs (system unit only)
MySpace sells to Specific Media for $35 million
Social network MySpace has been sold once again.
The buyer is digital-media company Specific Media, which purchased the site from News Corp. for an undisclosed sum. As part of the deal, News Corp. will take a minority equity stake in Specific Media.
AllThingsD's Kara Swisher, who first reported the sale earlier today, said Specific Media paid $35 million.
In a statement about the sale, Specific Media CEO Tim Vanderhook said: "Myspace is a recognized leader that has pioneered the social media space. The company has transformed the ways in which audiences discover, consume and engage with content online."
"There are many synergies between our companies as we are both focused on enhancing digital media experiences by fueling connections with relevance and interest," he said. "We look forward to combining our platforms to drive the next generation of digital innovation."
As part of the deal, Swisher says MySpace's staff of 400 will be cut in half, corroborating murmurs from yesterday that more layoffs were on the way. In a memo sent to employees, MySpace CEO Mike Jones made note of additional "restructuring initiatives" while also announcing that he's departing the company after a two-month transition period.
"My time here at MySpace represents the most engaging and challenging time of my professional career," Jones wrote. "I have found our team to be comprised of the best people I have come across in our industry."
MySpace was purchased by News Corp. in 2005 for a whopping $580 million as a way to help drive traffic to Fox's TV and media efforts. According to Swisher, News Corp.'s announced equity stake will be 5 percent to 10 percent of Specific Media. By comparison, Microsoft invested $240 million for a 1.6 percent stake in Facebook back in 2007, a company that was valued at $70 billion earlier this week.
MySpace underwent a massive redesign last year in an attempt to shed the site's stigma of lagging behind rival Facebook. This included adding a trending topics feature, and more media on profile pages to better integrate media from other properties.
Just a few months later, the company gutted its infrastructure, announcing a "significant organizational restructuring" that cut 47 percent of staff, or around 500 employees. That move was said to be tied to the company attempting to trim down to make itself more of a target for potential buyers.
During an earnings conference call in February, News Corp. CEO Chase Carey said that the time was right to sell off the Web property to a new buyer in order for the site to "reach its full potential," and that the company was "evaluating those strategic alternatives."
Gartner analyst Michael Gartenberg said the sale shows how volatile the social market is, and how quickly consumer tastes can change.
"The fundamental question is where did $550 million of value go?" Gartenberg said. "And there's a cautionary tale for other players in the space. Certainly the largest players have less to worry about, but smaller players that are looking very, very good today that are very niche may discover that consumers are more fickle than they think, and definitely have an affinity for the latest, shiny new thing that comes along."
According to research from Compete.com, MySpace pulled in 30.79 million unique visitors last month, which is down 6.34 percent compared with the previous month, and a 54.47 percent drop year over year. Looking at those numbers over the past two years, the chart looks like this:

Monthly unique visitors to MySpace, month by month for the past two years.
(Credit: Compete)
As for how the new buyers can change that trend, Gartenberg suggested refocusing the site on its music roots.
"If they double-down in that area and really focus the site on music, and can fit in this with existing music services that are out there, and the strong social connection, there's probably some sort of profitable business that can be rebuilt out of it," Gartenberg said. "But is it going to be a site that's going to dominate the entire social-network space? I think those days are behind it at this point."
Read more: cnet.com
"There are many synergies between our companies as we are both focused on enhancing digital media experiences by fueling connections with relevance and interest," he said. "We look forward to combining our platforms to drive the next generation of digital innovation."
As part of the deal, Swisher says MySpace's staff of 400 will be cut in half, corroborating murmurs from yesterday that more layoffs were on the way. In a memo sent to employees, MySpace CEO Mike Jones made note of additional "restructuring initiatives" while also announcing that he's departing the company after a two-month transition period.
"My time here at MySpace represents the most engaging and challenging time of my professional career," Jones wrote. "I have found our team to be comprised of the best people I have come across in our industry."
MySpace was purchased by News Corp. in 2005 for a whopping $580 million as a way to help drive traffic to Fox's TV and media efforts. According to Swisher, News Corp.'s announced equity stake will be 5 percent to 10 percent of Specific Media. By comparison, Microsoft invested $240 million for a 1.6 percent stake in Facebook back in 2007, a company that was valued at $70 billion earlier this week.
MySpace underwent a massive redesign last year in an attempt to shed the site's stigma of lagging behind rival Facebook. This included adding a trending topics feature, and more media on profile pages to better integrate media from other properties.
Just a few months later, the company gutted its infrastructure, announcing a "significant organizational restructuring" that cut 47 percent of staff, or around 500 employees. That move was said to be tied to the company attempting to trim down to make itself more of a target for potential buyers.
During an earnings conference call in February, News Corp. CEO Chase Carey said that the time was right to sell off the Web property to a new buyer in order for the site to "reach its full potential," and that the company was "evaluating those strategic alternatives."
Gartner analyst Michael Gartenberg said the sale shows how volatile the social market is, and how quickly consumer tastes can change.
"The fundamental question is where did $550 million of value go?" Gartenberg said. "And there's a cautionary tale for other players in the space. Certainly the largest players have less to worry about, but smaller players that are looking very, very good today that are very niche may discover that consumers are more fickle than they think, and definitely have an affinity for the latest, shiny new thing that comes along."
According to research from Compete.com, MySpace pulled in 30.79 million unique visitors last month, which is down 6.34 percent compared with the previous month, and a 54.47 percent drop year over year. Looking at those numbers over the past two years, the chart looks like this:
Monthly unique visitors to MySpace, month by month for the past two years.
(Credit: Compete)
As for how the new buyers can change that trend, Gartenberg suggested refocusing the site on its music roots.
"If they double-down in that area and really focus the site on music, and can fit in this with existing music services that are out there, and the strong social connection, there's probably some sort of profitable business that can be rebuilt out of it," Gartenberg said. "But is it going to be a site that's going to dominate the entire social-network space? I think those days are behind it at this point."
Read more: cnet.com
Facebook Tips

Listed here are TEN Search engine optimization techniques and tactics every Facebook Page user will have to understand:
1. Choose the very best Title for the Facebook Page – and do not Ever Change It Out
Selecting the best identity in your Facebook Page is vital. For example, in case your title seems too spammy, individuals will most likely be not as likely to discuss it using their affiliates by themselves page and more prone to hide your updates using their Facebook feed. Next, don’t give in to the temptation to select a totally common page title. Facebook’s intention for Pages is they legitimately characterize companies and brands, in addition to stars. Lately, Facebook continues to be crippling updates for common Pages.
2. Choose the most effective URL for the Facebook Page
Facebook lately provided the versatility to select a title for the Facebook Page, nearly the most crucial Search engine optimization option on Facebook up to now. Facebook wants Pages to legitimately are a symbol of the details of companies. Brands with generally used game titles have experienced their privileges suspended formerly.
The soundest solution is always to pick a username which legitimately presents your web business or company. The moment you choose a Facebook username/URL for the Page, it wouldn’t be changed. So, search for a username you will attend ease, and satisfied, with for future years. For those who have a business that is an expert in replica watches, result in the URL something related to replica watches.
3. Make use of the "About" box to put Search Phrase-Thick Content towards the top of the Page
One critical Search engine optimization approach that should be found in your Facebook Page whenever achievable is placing search phrase-thick content as near to the the surface of the Page as possible. Since Facebook limits wherever Page managers are able to place substantial parts of text message about the Wall of Facebook Pages, the "About" box essentially is the greatest location within the CSS structure from the page to include custom content. You will discover there’s 250 character restriction, so choose your content properly.
4. Make use of the "Info" Tab to include Extra Critical Keywords And Phrases, Content, and High Priority Back links in your Page
Facebook produces an "Info" tab for every Facebook Page that has fields comprised of important illustrative data concerning the Page. It’s vital that you complete each one of these fields, because they offer the possibility to include keywords and key phrases, content, and hyperlinks that could enhance the articles rating in your Facebook Page for a lot of types of Google queries. The particular fields existing could differ in line with the type you select for the Page if you create it, so choose the category which most effectively meets your company needs.
5. Develop "Static FBML" Boxes and Tabs to put Extended Articles Plus Much More Static Back links in your Page
While chances to put substantial blocks of text message about the default tab from the Facebook Page are usually quite restricted, Facebook allows Page managers to create-up supplemental boxes or tabs that could carry any kind of subject material, including text, images, and hyperlinks. Adding content boxes or tabs for your Page might be a powerful way to supercharge the score of the Page.
6. Publish Direct Back links Targeted at the Website Within Your Page’s Stream
Status updates provide a powerful means to fix place direct back links towards the top of your particular Page. Since Google boosts ranking for web pages which connect to relevant websites – and penalizes pages which connect to irrelevant webpages or that add a lot of backlinks too all of a sudden – posting hyperlinks in status updates can be very a highly effective and reliable method of better rank your Facebook Page.
You’ll find 2 techniques to submit hyperlinks:
a. Such as the URL inside the text from the status update itself.
b. While using "attach link" function.
7. Add Pictures with Captions, Activities with Explanations, along with a Conversation Community Forum
This almost is obvious, yet it’s imperative that you regularly spread helpful subject material about the Facebook Page, together with always using all offered illustrative fields on each and every type of content shared. When posting images apply extended and search phrase-thick explanations. Make use of the assets Facebook offers your whole gain.
8. Create Backlinks for your Facebook Page from the web by Posting Back links for your Page on All Of Your Websites
Just like a great number of backlinks from high-authority webpages might help improve PageRank for normal internet sites, obtaining backlinks for the Facebook Page may improve its PR too. You are able to make this happen with text back links, but Facebook has additionally created a badge so it encourages Page managers to make use of.
9. Get Intra-Facebook Backlinks simply by Obtaining More Facebook Supporters
The greater fans you receive, the greater back links you’ll have to your personal Page within Facebook. For Pages with 1000′s of supporters, the amount of back links mounts up.
10. Reinforce Intra-Facebook Connecting through getting Fans to examine and Like Content inside your Stream
Whenever supporters comment or like content inside your Facebook Page’s stream, Facebook links their title back to their personal Facebook profile page. Subsequently, when the profile stubs of individuals supporters who’ve set up feedback and likes in your Page are listed, Google will uncover more reciprocal links involving the Page as well as your Page’s fans, so it might find to become a far better relationship. This leads to a cycle of enhanced link weight in the listed profile page stubs for your Page.
Source: proarticlebase
Google+ Is Google’s Social Network with Group Video Chat, Mobile Messaging, and Easy Sharing
We've been hearing rumors about an upcoming Google-based social network for months, and Google's finally delivered. Their social project works similarly to other popular networks, but with innovative new additions like group video chatting, group messaging, and a much easier to use interface.
 What Is It?: Google+ isn't so much a social network, as we're used to the term, but a collection of services that have social aspects to them. You have a group of friends, but its more designed for small groups of your real-life friends rather than a giant friends list, with whom you share everything all the time. Instead, it helps you discover content, share it with the friends you think would like it, and communicating with them on an individual or small group basis. On the surface, though, it doesn't look all that different from Facebook or Twitter. You have a profile that's all about you, you can share thoughts, links and photos, and view a feed of the things your friends have shared. In practice, though, it's aimed at smaller groups of people, with a feature set that reflects that.
Circles: Google Circles is the center of Google+. It's similar to Facebook and Twitter lists, except it's actually easy to use: Google+ grabs your friends from your Gmail contacts, and you can drag and drop them into groups of people based on your relationships, interests, or whatever you want. The goal is to get rid of all the crap in your feed that you don't want to see. Got a group of techie friends? You can share all your Apple news or software tricks with them and only them. Got a humorous but raunchy video you'd rather not share with your mom? Share it with just your friends that appreciate off-color humor. Of course, it still relies on you actually creating those lists, but it's easier to do than on other networks, meaning that, in theory, you have a better chance of actually using the feature.
Sparks: Sparks is like a recommendation engine, Instapaper, and social network all rolled into one. You tell Sparks your interests and it'll grab recent, interesting content on that subject—whether it be videos, books, blog posts, or pretty much anything else Google can search. You can then save these items for later and share them with your friends. It's populated by how often things are being shared and through Google's +1 buttons, so it has the potential to be pretty cool—if people use it.
Hangouts: This is a really cool feature that other social networks (and even IM services) seem to be severely lacking: a "come video chat with me, I'm just hanging out" button. Right now, most people seem to schedule video chats ahead of time and with purpose—most people don't just video chat out of the blue. In Google+, you can just hit the hangout button and all your friends will see that you're available and not busy, open to video chatting. They can then "join" your hangout and video chat with you and other people. Again, it requires people actually use the service, but it's better than Skype or iChat as-is, where people only see that you're online, but there's no open invitation to come on in and video chat.
Huddle: Group texting is nothing new, but with BBM on BlackBerry, iMessages on iOS, and Android supposedly creating their own, there's very little that's cross-platform. Huddle is Google's answer, which will be available on more platforms and be a bit more at the forefront than, say, something like Facebook messages, which seems buried in a sea of other features. With Huddle, you send messages to all the members of one of your circles, perfect for planning a quick hangout without the hassle of mass text messages.
Google+ is going to have a desktop app that you can access from the top bar on every Google page, but it will also be available on both Android and iOS. Just like other social networks, this means you have access to your messages and your feed wherever you go, you can attach location to your posts, and instantly upload photos and videos to your profile.
So is Google+ something you'll actually want to use? It's possible—Google has already permeated themselves into every corner of our online existence, and with Google+ being in the toolbar of ever Google page you use (plus a few compelling features), it could very well become something you actually use. The whole thing's still a bit of a work in progress, so we'll just have to see how it plays out. It's invite-only for now, so head to the Google+ home page and request one for yourself to try it out.
Read more on: lifehacker.com
Call of Duty 4 Multiplayer Tips

Fire in Short Bursts
It’s as simple as this. If you keep your finger on the fire trigger…you’re going to die. Burst fire is by far the most effective firing method in call of duty 4. Short bursts are so effective because in most cases only a few bullets are need to stop your enemy and anything more then a short burst will decrease your shot accuracy
Flanking
Flanking, we’ve found, is the most under used AND most effective method for acquiring multiple quick kills in Call of Duty 4. Flanking is the method of making your way BEHIND your enemy (preferably while they’re in a fire fight with your team mates) so that you are positioned for an easy kill (or hopefully kills). Flanking is not always possible. There are a lot of positions on most maps were getting behind your enemy is impossible. But it usually doesn’t take long for the enemy to advance enough or move locations so that Flanking again becomes a viable strategy.
Use the Knife when in close range
If you are close enough to hit your enemy with the knife…DO IT! Even up against an enemy with a gun, knifes will almost always be more effective. The reason? It only takes ONE swipe with a knife to kill your enemy, were as it’ll usually take a few bullets to take them down.
Crouch
Crouching while moving is the most effective means of getting around the map. While crouching you’re fire is more accurate. To take advantage of this even more, try keeping your sites up while crouching and moving. Any enemy who comes running by will be easy pickins if you are crouched and sited. EXCEPTION: anytime you are in an open space with your back exposed to multiple locations…RUN. Run to a location where you can, 1. Take cover behind an object and crouch shoot or 2. Run to an area where your back is not exposed and you can crouch walk with your sites up.
Take Cover
When you’re taking fire, find the closest cover and crouch behind it. Be careful taking cover behind cars (It they haven’t already, they’ll explode when shot). Be careful taking cover behind objects that bullets can penetrate (crates, fences, clay walls, etc). Once the enemy has stopped firing, quickly take a look and return fire if possible. If you are being shot at by more than one enemy and want to get out from behind your cover to move to a more advantageous location, use a flashbang grenade.
Keep Moving
When you are not behind cover…you better be in motion. Standing out in the open is dumb, plain and simple. If you need to come out behind cover, make sure you know were you are going and if there is cover to hide behind when you get there. Using the crouch method described above when going from cover point to cover point is the best method for staying alive and achieving radar (3kills in a row without dying), airstrike (5 kills without dying) and Helicopter (7 kills without dying). The only time running is recommended is when the match first starts up and you are trying to get to a location that will give you a tactical advantage, (see map by map section), if you’re in an open area, or if you know an enemy is near and you are trying to make it into a building or behind a solid object
Read more: articlebase
Windows Optimal Settings - How to Remove Windows Optimal Settings Completely

Windows Optimal Settings belongs to the classification of rogue software. Windows Optimal Settings will scan your computer automatically and give out a report showing that there are several problems in your computer. To making users believe the fake system analysis report, Windows Optimal Settings will cause various problems by deleting real system files or modifying windows registry.
You must be wondering how Windows Optimal Settings infected your computer. Usually, Windows Optimal Settings is installed by some trojan, which will produce fake error message and recommend a program to fix the errors. Some users may think the error message is produced by windows system. Once you click on the link, Windows Optimal Settings will be downloaded to your system. In a few causes, Windows Optimal Settings is inrtoduced to the compromising computer by malicious codes.
Windows Optimal Settings can run automatically at windows startup. Once started, it will display tremendous error messages no matter when you are about to run a program or delete a file. Windows Optimal Settings will then prompt you to scan your computer. If you try to use Windows Optimal Settings to fix the errors, you will be informed that you have to purchase the program at first. The fact is Windows Optimal Settings is a fake system fixer tool and it can bring no benefit. Its only purpose is to mass up your system and cheat your money.
You must remove Windows Optimal Settings as soon as possible.
How to remove Windows Optimal Settings easily?
Using a spyware removal tool is surely the easiest way to get rid of Windows Optimal Settings. If you already have one in your system, follow the below step to remove Windows Optimal Settings now.
1. Enter Safe Mode (if your spyware removal needs networking, you should enter Safe Mode with Networking)
2. Open Task Manager to end Windows Optimal Settings process if the rogue software can automatically run at safe Mode.
3. Run a scan and remove detected files
4. Clean up temporary files
5. Clean up windows registry to make sure that Windows Optimal Settings does not leave some entries or it can easily get back to your computer.
Notes: The 5th step is option and depends on whether your spyware removal can clean up registry. The key in those steps is to block Windows Optimal Settings from running at first and the most important point is whether your spyware removal program can detect Windows Optimal Settings. If you encounter with problem in either of these two steps, you have another alternative.
Recommended Windows Optimal Settings removal tool
A couple of anti spyware programs on the market have tested to be able to remove Windows Optimal Settings completely. Comparing their comprehensive strength including prise, we recommend you to use PC Safe Doctor to remove Windows Optimal Settings. This specialized spyware removal tool can remove Windows Optimal Settings safely and completely.
The issue is urgent as your computer may finally be taken control by a remote party especially if you have already purchase Windows Optimal Settings. Moreover, if you find some manual way to remove the rogue software, you'd better not to have a try. Removing Windows Optimal Settings manually involves lots of PC skills and technical knowledge.
Read more: articlesbase.com
Useful Tips About Free Software & Software Download

The bandwidth trend, and the unlimited downloads made it easier for users all over the world to download any software within a matter of minutes. The greater the bandwidth, the more the surfing and more downloads. Opposing to this, is the dialup, when downloading a 10 MB file meant waiting for days and days. And today, download of a 1 GB file is equivalent to streaming some music videos.
This situation has given rise to websites which provide either free or paid download. Payment can be done through online system like PayPal etc. There are two forms of these basic websites:
Franchise Websites:
Franchise websites offer a database to all the software’s available. They either have parallel websites or to the link to the websites according to the particular software in question.
Coming to free software downloads, as the name suggests these are downloads free of cost. No payments or other charges for the software you want to download. Now all one needs to do is find a website that offers free downloads. Such websites can be easily found through search engines like Google. But finding fool proof software’s can be a painstaking job. We know that nothing on the internet is free. Even when you don’t get charged for the content you download, you might have to agree to some “terms and conditions” like a toolbar, or e-mags etc.
Open source software provides great deals in the software business. Such software is known to be free for use. Some companies (dotcom companies) don’t charge any amount for the download. These companies have numerous purposes for such offers like branding as free software is known as the best way to advertize.
Free Anti-Virus Software:
Free anti virus software is like lingering the bait in the sea. Many of such offers turn up to be hoax in the end, following a basic routine.
The user downloads the software for free; such versions are called trial or basic version. Scan the hard disk of the computer, and many anti virus software’s, while scanning may install the viruses themselves! These viruses can be harmful to the computer i.e. Trojan and malware viruses.
Now the Anti virus comes up with a LONG list of harmful viruses and alerts the user that they will now be cleared out
The user clicks, and now comes a million advertisements coaxing the user to buy the premium version of the software
There is some unlocked or open source anti-virus that is in fact superior to commercial software available in the market. Then, there are some anti-virus companies that have two versions of their anti-virus software, the home version and the enterprise or finest version. The house version of this anti-virus software is of good quality for personal use and is accessible as without charge and permissible software downloads.
Free Spyware Software:
This software’s also often tend to be fake or hoax. Like the Anti Virus software these also have the two versions; the premium and the home version.
Free Home Design Software:
These software actually cater to the needs of the users. This saves up costs of asking your architect to make miniature models. Now you can design your house and watch it on 3D by downloading this software.
Company Websites:
End-user software’s have their own websites owned by companies. A wide range of products are accessible on these websites and will be available for purchase. Specific products will be available only on the specific websites. For example, Microsoft word won’t be available on windows website.
Pros and Cons of Free Software Downloads:
Here is a quick list of the variety of benefits and losses of free of charge software downloads:
No Post Download Support: Companies rarely offer support for free downloadable software from their website. In fact, most software’s that are downloaded for free are mostly beta version, so even if they erase your entire BIOS, it is something a professional will pay no heed to.
Once, downloading single free software would generate ‘sponsor’ software’s. Funnily enough, the client wasn’t even informed that just for that ‘cool’ screensaver or theme, he/she would have these software, malware, Trojans and virus installed on their computer.
There have been a lot of changes though. Downloading free software isn’t as much of a risk anymore. And with the advent of open source, genuinely free software downloads are actually a reality in today’s world.
Source: isnare.com
All-In-One Funeral Software
Although many people find it very difficult to manage all the tasks for a funeral for a loved one, as a funeral professional, you can make these chores easier for everyone involved -- especially when it comes to creating distinctive funeral stationery, touching DVD tribute videos and high-tech funeral webcasts.
Although all-in-one software technology was created with the funeral professional in mind, the technology benefits client families as well. Streamlining the personalization activities for the death care professional, all-in-one funeral software is quick to learn, easy to use, and is there when you need it. With the time and money saved on dealing with outside vendors and re-printing funeral stationery with errors, funeral professionals are able to spend more time with their client families, serve more families and be more profitable.
Although all-in-one software technology was created with the funeral professional in mind, the technology benefits client families as well. Streamlining the personalization activities for the death care professional, all-in-one funeral software is quick to learn, easy to use, and is there when you need it. With the time and money saved on dealing with outside vendors and re-printing funeral stationery with errors, funeral professionals are able to spend more time with their client families, serve more families and be more profitable.
With all-in-one funeral technology, funeral professionals are able to create beautiful funeral stationery, inspirational video tributes and provide online funeral webcasting services. These menu driven applications walk the user step-by-step through the set up and creation of each product. Preview modes allow you to view and make any correction to what you are going to print or burn to DVD before you perform the task eliminating printing errors, costly mistakes and last minute rushing to correct any inaccuracies. Plus, advanced options have been enabled so that each funeral product or webcast is of top-notch quality and provides client families with a fitting tribute.
Personalized Funeral Stationery
The possibilities of creating unique, personalized and coordinated funeral stationery are almost endless with all-in-one funeral software. This latest technology allows funeral professionals to create up to 450 different themes and include complete personalization. For example, a personalized funeral register book could include not only photographs that tell the story of the person's life, but also include special poems or a verse of significance. Bookmarks can be created in house by the funeral professional as a memorial keepsake and contain the lyrics of the deceased's favorite song. The possibilities are truly endless.
Professional DVD Tribute Videos
Innovative funeral software has turned the DVD tribute video process into a simple three step process that may sound complex, but is really ultra easy. With as many or as few pictures the family would like to use, a funeral professional can quickly scan the photos, add some special effects like music, transitions, or picture touch up and then burn the tribute video onto a DVD. The result is a personal and professional tribute video client families will cherish.
Reliable Funeral Webcasting
With families moving further away from their nuclear circle, sons and daughters going off to college or to serve in the military, or due to illness -- it's not always possible to attend a funeral in person. With funeral webcasting, family and friends who can't attend a funeral can view the service online in either real time or later, at their convenience. For the funeral professional, getting started with funeral webcasting requires some basic equipment and using the proper webcasting software which is also available as part of an all-on-one suite. However, the start up costs are minimal, the software is easy to use and the results are fantastic.
As difficult as it is for a client family to contend with the loss of their loved one, using all-in-one funeral software can help lighten everyone's burden just a bit. The family will know that the funeral service created was as beautiful, inspirational and fitting of a tribute that anyone could imagine. Knowing that the little details are taken care of is always a comfort at such a difficult time.
Read more: articlesbase.com
How to Unlock a Locked Out User Account in Windows 7
Normally the account lockout duration security setting determines the number of minutes a locked out account remains locked out before automatically becoming unlocked. If the account lockout duration is set to 0 minutes, then a locked out user account will be locked out until an administrator manually unlocks that locked out user account.
This will show you how to manually unlock a user account that was locked out when it reached it's account lockout threshold of invalid logon attempts.
This will show you how to manually unlock a user account that was locked out when it reached it's account lockout threshold of invalid logon attempts.
Warning:
You will only be able to do this while logged in as an administrator.
Locked Out User Account
NOTE: This is the locked out message a user will get if they reach the account lockout threshold number of invalid logon attempts.

Here's How:
1. Open the Local Users and Groups manager.
2. In the left pane, select Users. (see screenshot below)

3. In the right pane under the Name column, double click on the locked out user account. (see screenshot above)
4. Uncheck the Account is locked out box, and click on OK. (see screenshots below)
NOTE: If the Account is locked out option is grayed out, then the selected user account is not locked out.


5. Close the Local Users and Groups manager.
Source: sevenforums
You will only be able to do this while logged in as an administrator.
Locked Out User Account
NOTE: This is the locked out message a user will get if they reach the account lockout threshold number of invalid logon attempts.
Here's How:
1. Open the Local Users and Groups manager.
2. In the left pane, select Users. (see screenshot below)
3. In the right pane under the Name column, double click on the locked out user account. (see screenshot above)
4. Uncheck the Account is locked out box, and click on OK. (see screenshots below)
NOTE: If the Account is locked out option is grayed out, then the selected user account is not locked out.
5. Close the Local Users and Groups manager.
Source: sevenforums
Improve Windows Vista & Windows 7 Performance: Advanced Performance Tools

Go into the Control Panel and click on Performance Information and Tools. In the Task pane, click on Advanced Tools. Here you’ll find some neat options for improving Vista’s performance. First, Windows will list any performance issues that it has encountered under the Performance Issues section. Follow the links to correct these issues.
Once you’ve addressed any known performance issues, go back to the Advanced Tools screen and explore the following links:
• View performance details in Event log – The Event log is a vast database detailing all “events” that have occurred on your Vista computer over time. Browse the information here in search for patterns and clues to poor performance.
• Open Reliability and Performance Monitor – This monitor gives you a graphical, real-time view of your computer’s performance including: CPU, disk, network, and memory performance. Click on the Reliability Monitor link to view a graphical chart detailing your system’s stability over time. Click on a date and view application, hardware, and Windows failures for that date.
• Open Task Manager – The Task Manager shows you every application and process running on your computer at the moment. It also provides you with CPU and memory usage information.
• View advanced system details in System Information – This link takes you to a display listing everything that you could ever imagine about your computer. If you’ve ever wondered what type and version of BIOS your computer has or which service pack and build your copy of Vista has running, this is the place to go.
• Adjust the appearance and performance of Windows – Follow this link to adjust visual effects, page file size, and data execution prevention.
• Open Disk Defragmenter – The Disk Defragmenter tool is used for re-packing the files on your hard disk. Over time, individual files are broken up into smaller files and pieced together by Windows as needed. When the disk becomes excessively defragmented, all of this piecing files back together takes time and sluggish performance is the result. Run the Disk Defragmenter weekly for the best results.
• Generate a System Health Report – Of all the tools listed in Advanced Tools, the System Health Report is the most useful. Click this link and wait for the System Health Report to be generated. Not only will you learn about the status of your Vista computer’s hardware, resources, processes, and response times, the report also lists suggestions for improving performance as well as displays test results for diagnostic operating system, disk, security, system services, and hardware and device driver checks.
Source: vista4beginners
How to burn a DVD-Video Disc with Nero Burning ROM
Nero is probably the most popular DVD burning program out there, as it comes bundled with many new computers and DVD drives. However, as I can judge from the messages I get, many users get confused from the many options that are available in the program, so in this guide we will clarify one thing: how to make a DVD video disc that plays in standalone players from a folder full of IFO, VOB and other files you have on your hard drive. If you want to create a DVD disc containing data or music files, simply select DVD-ROM (ISO) option and not what we show in this guide. Also at the end I have an extra step that shows how to burn an ISO file, if your DVD is in that format.
That guide should cover most of the cases! If you have any trouble or questions just use the comment form below.
Source: DVD-Guides
Step 1
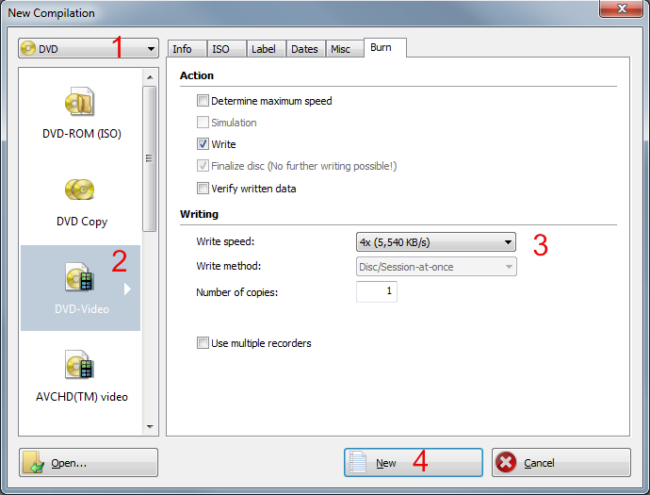 |
This is the default window when Nero starts, if it doesn't come up just go to New button in the top left corner. Here select DVD (1) as the type of media you want to burn and then DVD-Video (2). I suggest selecting a low burning speed like 4x (3) for DVD video discs especially if your standalone player is a bit old. Finally click New (4). |
Step 2
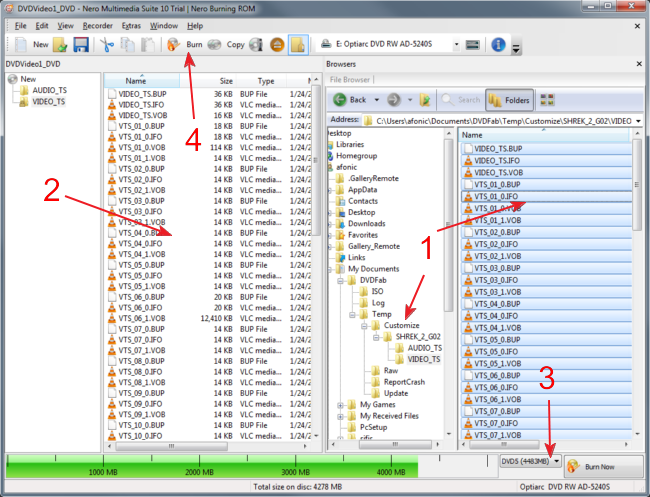 |
Here just find the files that you want to burn in the DVD, select them all (1) and drag them in the VIDEO_TS folder (2). It is important that you put all the files inside the VIDEO_TS folder and not in the DVD root. Then make sure DVD5 is selected (3) and click Burn (4). Keep in mind that we are burning ready DVD files. If you have another type of video files, like avi or mkv for example you need to convert them to DVD format first. Read this guide to learn how to do that. |
Step 3
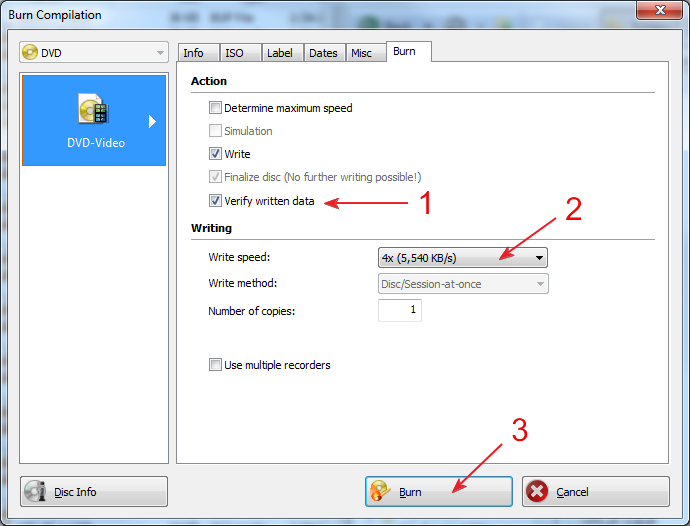 |
Here you can optionally select the verify (1) the disc after it is burned. It will take more time, but you are sure that you have a correct copy before you delete that DVD files off your hard disk. Remember what I said about Write speed in step 1 (2). When you are ready add a blank DVD and click burn (3). |
 |
That's all! Now just wait a few minutes and your DVD will be ready. |
If you have an .ISO file
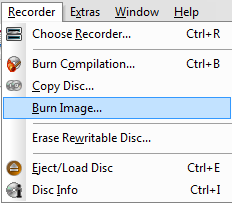 |
If you have your DVD already in an image format, like ISO, NRG or other you don't have to follow this guide. Just choose Recorder -> Burn Image from Nero's menu, select your image file and then just follow step 3, to correctly burn that file. |
Source: DVD-Guides
Free Download AKVIS Suite 2011 - Plugin for Adobe Photoshop

AKVIS ArtSuite is an impressive collection of versatile frames and effects for photos. ArtSuite contains many templates and texture samples that can be used to create a virtually limitless variety of options for generating frames. The software lets you decorate digital photos, create original postcards, personalized desktop wallpapers, etc.
Include:
* AKVIS ArtSuite v6.7
* AKVIS ArtWork v4.0
* AKVIS Chameleon v7.0
* AKVIS Coloriage v7.5
* AKVIS Enhancer v11.5
* AKVIS Lightshop v3.0
* AKVIS Magnifier v4.0
* AKVIS MultiBrush v5.5
* AKVIS NatureArt v2.0
* AKVIS Noise Buster v7.5
* AKVIS Refocus v1.0
* AKVIS Retoucher v4.5
* AKVIS Sketch v12.0
* AKVIS ArtSuite v6.7
* AKVIS ArtWork v4.0
* AKVIS Chameleon v7.0
* AKVIS Coloriage v7.5
* AKVIS Enhancer v11.5
* AKVIS Lightshop v3.0
* AKVIS Magnifier v4.0
* AKVIS MultiBrush v5.5
* AKVIS NatureArt v2.0
* AKVIS Noise Buster v7.5
* AKVIS Refocus v1.0
* AKVIS Retoucher v4.5
* AKVIS Sketch v12.0
Download:
Free OCR Software – Convert Image to Text
Have you ever received a camera picture of a document instead of its MS Word soft copy? Do you have old prints, magazine clippings, and book pages that you would like to copy as text? Convert a scanned image, or a camera taken picture o text with the use of an OCR software.
Use Free Online OCR - Free-OCR.com

Use Free Online OCR - Free-OCR.com
FREE-OCR.com is a free service that gives you the convenience of converting PDF, JPG, GIF, TIFF or BMP files into text. The free OCR service accepts up to 2mb file sizes. Another great feature is the option for specifying the language of the document for OCR. This ensures thes best pattern matching of the OCR’d characters.

Microsoft Office Document Imaging

Unknown to many users of MS Office, Microsoft Office Document Imaging has been around since 2003.

FreeOCR Software – http://www.PaperFile.net

FreeOCR Software is indeed free, easy to install, and produces good OCR detection results. Free OCR is a document scanning software including the Windows compiled Tesseract free ocr engine also known as a Tesseract GUI. It includes a Windows installer and It is very simple to use and supports opening multi-page tiff documents, Adobe PDF and fax documents as well as most image types including compressed Tiff's which the Tesseract engine on its own cannot read .It now can scan using Twain and WIA scanning drivers.
Microsoft Office Document Imaging
Unknown to many users of MS Office, Microsoft Office Document Imaging has been around since 2003.
- Open the file using Microsoft Office Document Imaging
- Click the little eye icon, click Recognize Text Using OCR
- After the OCR scanning has completed, highlight on text, and the option for copying the text is now available. Paste the OCR’’d text contents on your document.
FreeOCR Software – http://www.PaperFile.net
FreeOCR Software is indeed free, easy to install, and produces good OCR detection results. Free OCR is a document scanning software including the Windows compiled Tesseract free ocr engine also known as a Tesseract GUI. It includes a Windows installer and It is very simple to use and supports opening multi-page tiff documents, Adobe PDF and fax documents as well as most image types including compressed Tiff's which the Tesseract engine on its own cannot read .It now can scan using Twain and WIA scanning drivers.
How to Partition and Format Hard Drives in Windows
A hard disk partition defines the storage space on your hard drive. This process allows you to make smaller, yet more logical, hard disks. Formatting the hard drive defines the kind of file system you will need to access your hard drives and partitions.
Creating and formatting a partition in Windows
Before you can create a partition on your hard drive in Windows, you will need to install an unused hard disk or must have ample unpartitioned space availabe on your existing hard drive. You can also opt to delete an existing partition to create a new one. In this tutorial, I will partition and format the unused space from one of my hard drives. The steps here will also work with hard disks with partitions which have been previously deleted; as well as with brand new hard drives.
Follow the steps to open the Disk Management Administrative Tool to access hard disk tasks:
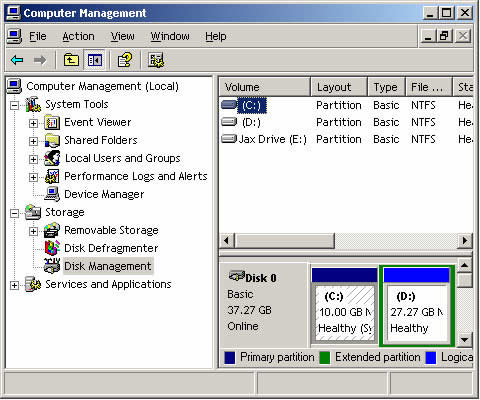
In the disk management tool, you will see a listing of all your hard drives and how they are partitioned. The image above shows that I have two hard disks installed. The first disk, or DISC 0, has two partitions. Drive letter C has 24 GB NTFS, while Drive letter E has 87 GB NTFS. These drive letters were assigned during a previous partition. In the second drive, there is only one partition, which is the D: partition. There is 26 GB of unallocated and therefore useable space that can be used to make other partitions.
From the unused space, you can make a partition by following the steps below.
Deleting a Partition in Windows
If you have an existing partition in your hard drive, and you wish to delete this for purposes only known to you, it is important for you to know that you will lose all the data in your partition.
Follow the steps below:
- Click on the START button and select the CONTROL PANEL. If you do not have this shortcut on the START menu, open MY COMPUTER and click on the CONTROL PANEL.
- Double-click on the ADMINISTRATIVE TOOLS icon and open COMPUTER MANAGEMENT.
- If the CONTROL PANEL is in Category view, click on PERFORMANCE AND MAINTENANCE, then click on ADMINISTRATIVE TOOLS, and lastly double-click on the COMPUTER MANAGEMENT icon.
- Once the COMPUTER MANAGEMENT screen opens, just click on the DISK MANAGEMENT option; it is under the STORAGE category. A screen similar to the one below will appear.
In the disk management tool, you will see a listing of all your hard drives and how they are partitioned. The image above shows that I have two hard disks installed. The first disk, or DISC 0, has two partitions. Drive letter C has 24 GB NTFS, while Drive letter E has 87 GB NTFS. These drive letters were assigned during a previous partition. In the second drive, there is only one partition, which is the D: partition. There is 26 GB of unallocated and therefore useable space that can be used to make other partitions.
From the unused space, you can make a partition by following the steps below.
- Right click on the unallocated space.
- A new menu will come up, click on the NEW PARTITION option.
- A wizard on how you would like the partition to be created will open. On the first screen, press NEXT.
- On the second screen, you will be made to choose between a primary or extended partition. Detailed information about these kinds of partitions can be read at the tutorial listed above. Select Primary Partition, which is fine for most people, and press NEXT.
- The third screen will help you determine how much of the unallocated space you would like to use for the new partition. You can choose to use of all of space or you can stick with the default size. After you enter a size in the Partition size in MB: field, press NEXT.
- In the next screen, select a drive letter you want to assign your new partition, or you can also use the default letter given. The drive letter you chose will be how you access the partition later. Press NEXT when you are done.
- The next step will ask you how you would like the new partition to be formatted. The NTFS file system is advisable for most people. However, if you need a file system that is readable by older operating systems, such as DOS, Windows 95, Windows 98 or Windows ME, you should choose the FAT32 file system.
- You can type in a name for the Volume Label field, or you can leave it blank. This name will be associated with the new partition.
- After you press the NEXT button, a summary screen will appear. If you are satisfied with the partition you created, press FINISH to complete the creation and formatting of the new hard disk partition.
Deleting a Partition in Windows
If you have an existing partition in your hard drive, and you wish to delete this for purposes only known to you, it is important for you to know that you will lose all the data in your partition.
Follow the steps below:
- Click on the START button and select the CONTROL PANEL. If you do not have this shortcut on the START menu, open MY COMPUTER and click on the CONTROL PANEL.
- Double-click on the ADMINISTRATIVE TOOLS icon and open COMPUTER MANAGEMENT.
- If the CONTROL PANEL is in Category view, click on PERFORMANCE AND MAINTENANCE, then click on ADMINISTRATIVE TOOLS, and lastly double-click on the COMPUTER MANAGEMENT icon.
- Once the COMPUTER MANAGEMENT screen opens, just click on the DISK MANAGEMENT option; it is under the STORAGE category.
- Click on the partition you wish to delete and then choose the DELETE PARTITION option.
- A confirmation box will appear, and ask you if you are sure you wish to continue. Press YES if you are only sure that you want to delete the partition. Remember, if you press yes, all the data in the partition will be deleted.
- After you press YES, the partition will be deleted. You can choose to exit the program or create a new partition.
How to Do the XBox 360 Towel Trick

Overheating is the main cause of the XBox 360 3 red lights error.The early XBox 360 models were all made with power and good looks in mind, unfortunately, Microsoft didnt really think about the heat being generated by all of these components packed into a tight space.There are 2 cooling fans at the rear but they arent up to the job and the case is very narrrow, and doesnt allow enough heat to escape. The towel trick then is an attempt to fix this overheating problem.
The xbox 360 towel trick basically involves you wrapping a towel around your console and letting it heat up again.Although it seems hard to believe there is some good theory behind the madness of wrapping your XBox 360 up in a towel. The only sure way to fix the 3 red light error is to get a good guide from the internet and perform the fix yourself.There are many good guides available to download, all for about the cost of a game, and they need no special tools to do the fix, which takes abot an hour.Best thing sbout it is the fix is permanent and above all safe.
Alright, you've got your hair all over the floor now because your dear old Xbox 360 is showing the dreaded - RROD! While this is happening, you already have your best friends - COD4, FFXIII, Gears of Wars 2 waiting for you on the rack but you can't play them!
Step-by-step guide on how to do the Xbox 360 towel trick:
NOTE: I'll have to warn you that this method involves heating the internal chips to extremely high temperatures so that broken solder points get resoldered again and warped components get reshaped. So instead of a fix, you're actually damaging your Xbox 360 further, and expect to see RROD in another few days.
Alright, you've got your hair all over the floor now because your dear old Xbox 360 is showing the dreaded - RROD! While this is happening, you already have your best friends - COD4, FFXIII, Gears of Wars 2 waiting for you on the rack but you can't play them!
Step-by-step guide on how to do the Xbox 360 towel trick:
- You'll need to confirm that your Xbox 360 actually has the 3 red lights, and not any other errors.
- Prepare 3 towels, like those that you normally use for showers.
- Stay focus, and remove everything from the Xbox 360, including the hard drives, wired controllers, games, etc, however, DO NOT remove the power supply.
- Take the towels, make sure they are dry, and wrap them around your Xbox 360 consoles.
- Next up, plug on the Xbox 360's power supply and turn your console on. Don't worry if you notice the usual Red ring of death. Continue letting it run for 15-20 minutes.
- Afterwards, turn off the Xbox 360 including the power supply and let it cool down for 10 minutes or longer.
- Plug everything back in and turn it on again. It should work by now.
NOTE: I'll have to warn you that this method involves heating the internal chips to extremely high temperatures so that broken solder points get resoldered again and warped components get reshaped. So instead of a fix, you're actually damaging your Xbox 360 further, and expect to see RROD in another few days.
How to utilize PC access software?
There is no limit of technology as it is expanding its wings amazingly and achieving new milestones with every single day. You won't believe that you can access or store data even from other remote locations. It is really a valuable technology especially for the business professionals as they can use the data which is not available on their machines. Yes, it is possible by using Remote Access Software which is extremely beneficial for the employees and employers. It comes at a very inexpensive price tag and can be installed easily on the computer, making it one of the most affordable and attractive option for the business professionals.
For external and internal use
Most companies or businesses often utilize Remote Access software to allow their staff to work either from home or another location. These software options have amazing features as these enable telecommuting, streamline workflow and improve the collaboration efforts. There are numerous companies available which utilize this software as an outdoor device in order to repair computers remotely or to work with clients on other locations. These software options can also be used to connect with devices which are internet capable including smart phones, PDAs and computer tablets.
What are the security concerns?
If you are using Remote Desktop Software, make sure that the connection is secure. Some professionals often use smart cards so as to offer secure authentication. Actually, most smart cards need authorization credentials along with a security code, allowing users to sign in securely. All types of communication via remote access must be encrypted and different kinds of access are also available. But just make sure that all the unused network ports or protocols are disabled.
Some benefits of remote access
The remote access software helps employees transfer business files and makes it easier for them to collaborate with projects. Also, the data can be used from a multitude of sources which, simply put, means that web presentations and teleconferencing are very easy to incorporate. The software can be used and copied in a variety of locations, and implemented from different computers. There are different kinds of PC remote access software available to be installed or purchased online. Some companies even offer a free trial which thus helps in choosing the right program. The cost depends upon the feature of software; the more the features, the higher the cost. Therefore, it can be said that PC remote access is very easy to use and everyone can install it without any technical assistance.
PC build and repair DVDRip 815MB

This is 2 hours video (tutorial) which gives you very useful information about the change in computer components and the changing in technology; how to build and repair your computer almost without needing any help.
Features:
File size : 815 MiB
Duration : 2h 5mn
Overall bit rate : 905 Kbps
Video:
Format : AVC
Codec ID : avc1
Duration : 2h 5mn
Bit rate : 768 Kbps
Width : 480 pixels
Height : 320 pixels
Display aspect ratio : 1.500
Frame rate : 25.000 fps
Resolution : 24 bits
Colorimetry : 4:2:0
Scan type : Progressive
Bits/(Pixel*Frame) : 0.200
Stream size : 689 MiB (84%)
Audio:
Format : MPEG Audio
Format profile : Layer 3
Codec ID/Hint : MP3
Duration : 2h 5mn
Bit rate mode : Constant
Bit rate : 128 Kbps
Channel(s) : 2 channels
Sampling rate : 44.1 KHz
Resolution : 16 bits
Stream size : 115 MiB (14%)
Download:
How to Setting System Restore In Vista and Se7en
If you want to change when or how often System Restore creates an automatic restore point then this is how.
Click on the Start Orb and in the 'Search' box type Task Scheduler and click 'Enter'.
In the scheduler click on 'Task Scheduler Library' then 'Microsoft'.

Click on the Start Orb and in the 'Search' box type Task Scheduler and click 'Enter'.
In the scheduler click on 'Task Scheduler Library' then 'Microsoft'.

Click on Windows then scroll down to 'System Restore' and click on that.
You will now see SR Ready (or Queued) Multiple Triggers Defined, double click on that.

Click on the 'Triggers' tab and you will see the default settings are to run at Startup and midnight everyday.

If you never have your computer on at midnight ( I dont, I am at work) then you can change it to a more suitable time by double clicking on the task.
On the next window that opens you will see the default settings, dont change 'On a Schedule' but you can now change the start time by clicking on either the 'Up' or the 'Down' arrows.

It is advisable to leave the rest of the default settings under this tab as they are but obviously the choice is yours.
Click on the 'Conditions' tab and you will see that the computer idle time is 10 minutes by default, this is the time the schedule will wait after your machine is idle before running.
The 'Wait for idle for' means the schedule will run up to the time you have set, in my case 23 hours.

The 'History' tab shows you when the task has been run in the past and the outcome.

Click on the 'Triggers' tab again and double click on 'At Startup'.
You will see a delay of 30 minutes has been set, this is so it wont run while your machine is booting so leave it on that setting.

Click on 'OK' then close the Sheduler and any changes you made will be saved.
Although it worth changing the default midnight time to a more suitable time, I wouldnt change the settings much more than that.


Subscribe to:
Posts (RSS)