 Second Copy - an excellent program, designed for and intended for automation of data backup. It can backup your files on different drives, directories or networked computers. Second Copy checks the source files for changes and automatically updates the backup as needed. After a simple setup program running in the background and requires no user intervention. After installation, you'll always have your important data in the specified location!
Second Copy v8.0.3.0
Second Copy - an excellent program, designed for and intended for automation of data backup. It can backup your files on different drives, directories or networked computers. Second Copy checks the source files for changes and automatically updates the backup as needed. After a simple setup program running in the background and requires no user intervention. After installation, you'll always have your important data in the specified location!Set a Video as Desktop Background
Do you want to set a Video as your desktop background instead of wallpaper?
Its very simple to impress your buddies by doing so... If you want set a video background, just follow this simple steps:
1. First of all you need a VLC player installed in your OS to perform this task. If not than download the VLC player from internet and install it.
2. Run VLC media player,go to Settings >> preferences >> Interface >> Main interfaces, then click on wxWidgets. Remove the tick on "Taskbar" and put a tick on "Systray icon".
3. Now go to Video >> Output Modules >> DirectX. On the bottom right put a tick on advanced options check box. You will now see some options. Put a tick on "Enable Wallpaper Mode".
4. Now, select playlist and put a check or tick on "Repeat current item".
5. Press the Save button. Now close the Vlc player and run it again (to save the settings permanently).
6. Now play any video you would like to set as Wallpaper. Right click on the video and click on "Wallpaper". The video would be set as your wallpaper!
Its very simple to impress your buddies by doing so... If you want set a video background, just follow this simple steps:
1. First of all you need a VLC player installed in your OS to perform this task. If not than download the VLC player from internet and install it.
2. Run VLC media player,go to Settings >> preferences >> Interface >> Main interfaces, then click on wxWidgets. Remove the tick on "Taskbar" and put a tick on "Systray icon".
3. Now go to Video >> Output Modules >> DirectX. On the bottom right put a tick on advanced options check box. You will now see some options. Put a tick on "Enable Wallpaper Mode".
4. Now, select playlist and put a check or tick on "Repeat current item".
5. Press the Save button. Now close the Vlc player and run it again (to save the settings permanently).
6. Now play any video you would like to set as Wallpaper. Right click on the video and click on "Wallpaper". The video would be set as your wallpaper!
Tux Walk 1.0
 File Name: Tux Walk 1.0
Author: Zamaan's Software
Size: 2348 KB
Date Added: June 5, 2006
Have the Linux Penguin, Tux, walk around on your windows desktop! He is a little desktop pet that will keep you entertained by doing funny things.
Rohos Mini Drive 1.19
 Rohos Mini Drive creates hidden and encrypted partition on the USB flash drive memory. You work with the files on the hidden partition without opening a special program. Those who have megabytes of sensitive files on the USB drive and seriously concerned with a data security, cannot imagine their USB stick without the hidden volume that is created using this tool.
Main Features:
* Creates a virtual encrypted partiton volume (disk) within a USB flash drive free space
* Automatically detects your USB stick config and creates encrypted partition
* Program does not require installation to work with encrypted partiton on a guest computer. You can start it right from USB drive
* Encrypted partition is protected by password
* Encryption is automatic and on-the-fly
* Encryption algorithm: AES 256 bit key lenght. NIST approved.
* Rohos Disk Browser to open encrypted partition without having Admin rights
* Virtual Keyboard - to protect your encrypted disk password from a key logger
* Autorun Folder. Saved program’s/file’s shortcut will automatically start/open up upon disk connection
* The limit of encrypted partition size is 2 GB
System requirements:
* Windows 2000/XP/2003/Vista
* USB 1.1/2.0 port
* USB flash drive or U3 Smart flash drive with 1 Mb or more free space
3 Ways to Open .PSD Files without Installing Adobe Photoshop
.PSD extension file stands for Photoshop Document and is related to the Adobe Photoshop application. The .PSD file works only in the Adobe Photoshop as it stores many imaging options available in Photoshop.
So if you like editing the images but do not want to spend lots of bucks on the software then this tip is surely for you and also because the following tools do not occupy huge memory as compared to Adobe Photoshop.
Method 1:
Paint.NET
 We have written about this image editor before and it is a really cool image editor. But by default this can not edit the .PSD files. For that you will be requiring a plug-in that will make this tool to open and edit the .PSD files.
• First download and install Paint.NET
• Now download the psdplugin, unzip and copy the PhotoShop.dll to the “FileTypes” folder in the Paint.NET directory. By default it should be in C:\Program Files\Paint.NET\FileTypes.
Now you can open PSD files.
Download Paint.NET
Method 2:
IrfanView
 IrfanView is a small, free and fast image viewer/converter that can open .PSD files easily.
Download IrfanView
Method 3:
GIMP
 GIMP standing for GNU Image Manipulation Program is a free image retouching tool that supports .PSD files by default.
Download GIMP
So if you like editing the images but do not want to spend lots of bucks on the software then this tip is surely for you and also because the following tools do not occupy huge memory as compared to Adobe Photoshop.
Method 1:
Paint.NET
 We have written about this image editor before and it is a really cool image editor. But by default this can not edit the .PSD files. For that you will be requiring a plug-in that will make this tool to open and edit the .PSD files.
• First download and install Paint.NET
• Now download the psdplugin, unzip and copy the PhotoShop.dll to the “FileTypes” folder in the Paint.NET directory. By default it should be in C:\Program Files\Paint.NET\FileTypes.
Now you can open PSD files.
Download Paint.NET
Method 2:
IrfanView
 IrfanView is a small, free and fast image viewer/converter that can open .PSD files easily.
Download IrfanView
Method 3:
GIMP
 GIMP standing for GNU Image Manipulation Program is a free image retouching tool that supports .PSD files by default.
Download GIMP
Avast Internet Security v5.0.594 + CRACK VALID Till 2020
 Core and detection
Image Antivirus and anti-spyware engine
State of the art scanning engine provides reliable protection against viruses, spyware and other forms of malicious software.
Real time anti-rootkit protection
Unique "on access" technology checks all kernel-mode drivers that the operating system is loading for signs of rootkit behavior. This enables even unknown rootkits to be detected and stopped before they can do any damage.
Image avast! Sandbox
Enables potentially exploitable programs (such as web browsers) and/or suspicious executables to be run in a safe, virtual environment. The avast! Sandbox is unique as it runs on both 32 and 64bit platforms.
avast! Community IQ
Most samples we process come from sensors deployed throughout the avast! community in the Behavior shield and anti-rootkit modules. This is a unique source of data made possible only thanks to our huge user base. Most of the collected samples are analysed by a number of automated processes and only a small fraction of the samples need to be processed manually by our virus analysts.
Image Code emulator
When a suspicious executable is encountered (during both on-demand and on-access scanning), avast! is able to emulate the program’s code in an isolated environment. The code emulator is used for two purposes. First, it is used for generic unpacking. Secondly, it is used in the heuristics engine. Technically, this is done using dynamic translation, a method much faster than traditional emulation techniques.
Image Heuristics engine
Starting with version 5.0, avast! features a new heuristics engine designed to proactively detect malware undetectable with normal definitions. The heuristics engine is able to cover both binary (executable) and script malware.
Potentially unwanted programs detection
5.0, avast! now detects potentially unwanted programs, such as remote admin tools and commercial key loggers. Custom rules can be set for dealing with these types of programs.
Additional Protection
Silent Firewall
The firewall enables you to control incoming and outgoing traffic from your computer. Protection is based on heuristic and behavioral analysis, and a white list of known safe applications. There are three network settings which can be changed depending on the type of connection.
Antispam
New comprehensive SPAM and fraudulent message filter. It works as a plug-in to MS Outlook and a generic POP3/IMAP4 proxy for other email clients.
Scanning
Boot-time scanner
Allows you to scan your computer for infections before the operating system has started and before a virus can be activated (32-bit operating systems only).
Command-line scanner
Enables you to run a scan directly from the command line.
Wake-up for scan
Microsoft Windows is woken from sleep or hibernation mode, performs a scheduled scan, then returns back to sleep mode.
Scheduled scanning
Allows users to define the scan time and files to be scanned.
Image avast! Intelligent Scanner
Can reduce the number of required file scans by up to 80% through a white list of proven safe applications. Files identified as safe are not rescanned unless they change.
Shields
Image Behavior Shield
Monitors activity on your computer using a number of sensors (file system, registry and network based) and reports/blocks any suspicious behavior.
Behavioral Honeypots
avast! sensors identify and monitor suspicious file activity on selected computers, automatically submitting files to the Virus Lab for additional analysis.
File System Shield
Real-time scanning of opened/executed files.
Mail Shield
Scans all incoming/outgoing e-mails for malware. For MS Outlook, a special plug-in is used. Other email clients are protected by a generic POP3/IMAP4/SMTP proxy. New in version 5, the proxy also supports scanning of SSL communication (gmail.com, sympatico.ca, ….)
Web Shield
Scans all visited web pages and checks all files, pages and java scripts downloaded from the internet. Thanks to the Intelligent Stream Scan feature, the Web shield doesn't slow down your web browsing.
P2P Shield
Checks files downloaded using P2P programs. - ABC, Ares, Azureus, BearShare, Bit Torrent, BitComet, BitLord, BitPump, CZDC++, Direct Connect, eDonkey, eMule, iDC++, iMesh, Kazaa, Kceasy, LimeWire, Morpheus, Opera's DC++, Overnet, Qtrax, Shareaza, SoulSeek, StrongDC++, uTorrent, Vuze, WinMX, Winny2, Zultrax.
IM Shield
Checks files downloaded while using instant messaging or “chat” programs. - AIM (AOL Instant Messenger), Gadu-Gadu, gaim/Pidgin, Google Talk, ICQ, IM2 Messenger, Infium, Miranda, mIRC, MSN/Windows Messenger, Odigo, PalTalk Messenger, Psi Jabber Client, QIP, QQ, SIM, Skype, Tlen, Trillian, WengoPhone, XFire, Yahoo! Messenger.
Network Shield
Provides protection against network-based viruses. The module has two main components: a URL blocker, designed to block malicious URLs (as defined by the Virus Lab), and a lightweight intrusion-detection system.
Script Shield
Detects malicious scripts hidden in internet web pages and prevents them from running and hijacking or potentially causing damage to your computer (Internet Explorer only, 32-bit only).
Updates
Smart virus definition updates
Incremental updating system minimizes the size of regular update files.
Image Fast application of updates
New format for the virus definition file speeds up application of updates into avast! 5.0 and reduces demand on CPU/memory, resulting in uninterrupted computer use.
New format for the virus definition file means faster updates and reduces demand on CPU/memory, resulting in uninterrupted computer use.
Gaming
Image New Silent/Gaming Mode
New Silent/Gaming Mode automatically detects full-screen applications and disables pop-ups and other on-screen notifications without degrading security.
Optimized for latest Intel Core i7 CPUs
Critical sections of the avast! scanning engine code have been optimized to deliver unrivaled performance on the latest Intel chips.
CPU optimization
Image Multi-threaded scanning optimization
avast! runs faster on new multi-core CPUs. A new avast! feature allows the splitting of large individual files between cores, accelerating the scanning process.
Green computing
Reduced demands on the disk drive result in lower energy consumption.
Miscellaneous
Miscellaneous
avast! iTrack
Real-time graphic scanning reports.
Image Graphical user interface
Easy to navigate graphical interface.
Automatic processing
Infected files are processed automatically without requiring user instructions.
System requirements
* Processor Pentium 3, 128 MB RAM, 100 MB of free hard disk space
* Microsoft Windows XP/Vista/7 (32/64 bit)
Make Firefox Really Fast
Fast loading web pages while surfing the Internet may have more to do with your web browser settings[/URL] and preferences than your Internet connection speed.
Try these easy Firefox tweaks and you’ll see that you’re surfing the Internet from 3 to 30 times faster!
To get started, open your Firefox web browser. In the address/location bar type [about:config] and then press your Enter key. (NOTE: DON’T TYPE THE BRACKETS.)
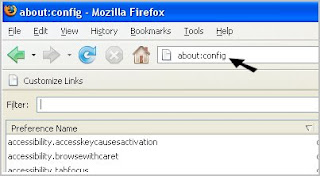
Tweak #1:
In the Filter bar type [network.http.pipelining]. Then, double-click on this line under Preference Name in order to change the value from false to true.
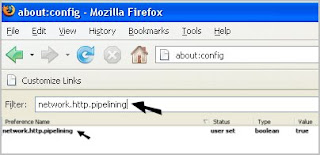
Tweak #2:
In the Filter bar type [network.http.pipelining.maxrequests]. Then, double-click on this line under Preference Name and change the value from 4 to a higher number anywhere from 10 to 30. I set mine to 30.
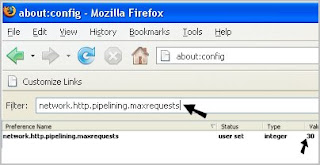
Tweak #3:
In the Filter bar type [network.http.proxy.pipelining]. Then, double-click on this line under Preference Name in order to change the value from false to true.
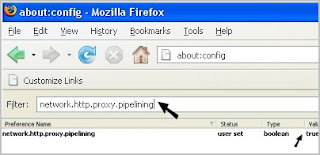
Tweak #4:
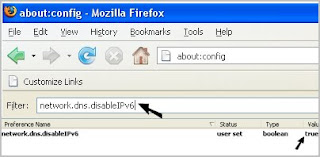
In the Filter bar type [network.dns.disableIPv6]. Then, double-click on this line under Preference Name in order to change the value from false to true.
Tweak #5:
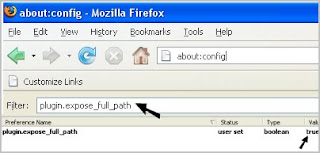
In the Filter bar type [plugin.expose_full_path]. Then, double-click on this line under Preference Name in order to change the value from false to true.
Tweak #6:
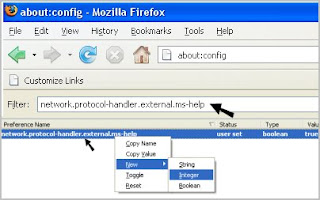
In the Filter bar type [network.protocol-handler.external.ms-help]. Now, you are going to create a new Preference Name with an Integer Value. To do this, right-click on this line under Preference Name and select New, then Integer.
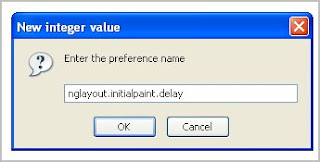
In the New Integer value box type in [nglayout.initialpaint.delay] and click OK. Then in the Enter Integer value box type [0] (that’s a zero) and click OK.
Tweak #7:
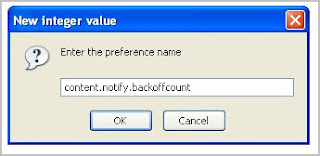
In the Filter bar again type [network.protocol-handler.external.ms-help]. Now, you are going to create another new Preference Name with an Integer Value. To do this, right-click on this line under Preference Name and select New, then Integer. In the New Integer value box type in [content.notify.backoffcount] and click OK. Then in the Enter Integer value box type [5] and click OK.
Tweak #8:
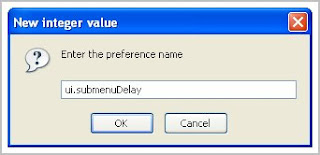
In the Filter bar again type [network.protocol-handler.external.ms-help]. Now, you are going to create another new Preference Name with an Integer Value. To do this, right-click on this line under Preference Name and select New, then Integer. In the New Integer value box type in [ui.submenuDelay] and click OK. Then in the Enter Integer value box type [0] (that’s a zero) and click OK.
Now, close your web browser and restart it. You’ll see how much faster web pages are loading. I sure did.
Let me know if these tweaks increase your Internet browsing speed. Know of any other tweaks or tricks? Let me know and I’ll add them.
Try these easy Firefox tweaks and you’ll see that you’re surfing the Internet from 3 to 30 times faster!
To get started, open your Firefox web browser. In the address/location bar type [about:config] and then press your Enter key. (NOTE: DON’T TYPE THE BRACKETS.)

Tweak #1:
In the Filter bar type [network.http.pipelining]. Then, double-click on this line under Preference Name in order to change the value from false to true.

Tweak #2:
In the Filter bar type [network.http.pipelining.maxrequests]. Then, double-click on this line under Preference Name and change the value from 4 to a higher number anywhere from 10 to 30. I set mine to 30.

Tweak #3:
In the Filter bar type [network.http.proxy.pipelining]. Then, double-click on this line under Preference Name in order to change the value from false to true.

Tweak #4:
In the Filter bar type [network.dns.disableIPv6]. Then, double-click on this line under Preference Name in order to change the value from false to true.

Tweak #5:
In the Filter bar type [plugin.expose_full_path]. Then, double-click on this line under Preference Name in order to change the value from false to true.

Tweak #6:
In the Filter bar type [network.protocol-handler.external.ms-help]. Now, you are going to create a new Preference Name with an Integer Value. To do this, right-click on this line under Preference Name and select New, then Integer.

In the New Integer value box type in [nglayout.initialpaint.delay] and click OK. Then in the Enter Integer value box type [0] (that’s a zero) and click OK.

Tweak #7:
In the Filter bar again type [network.protocol-handler.external.ms-help]. Now, you are going to create another new Preference Name with an Integer Value. To do this, right-click on this line under Preference Name and select New, then Integer. In the New Integer value box type in [content.notify.backoffcount] and click OK. Then in the Enter Integer value box type [5] and click OK.

Tweak #8:
In the Filter bar again type [network.protocol-handler.external.ms-help]. Now, you are going to create another new Preference Name with an Integer Value. To do this, right-click on this line under Preference Name and select New, then Integer. In the New Integer value box type in [ui.submenuDelay] and click OK. Then in the Enter Integer value box type [0] (that’s a zero) and click OK.

Now, close your web browser and restart it. You’ll see how much faster web pages are loading. I sure did.
Let me know if these tweaks increase your Internet browsing speed. Know of any other tweaks or tricks? Let me know and I’ll add them.
Menangkal NetCut dengan Anti NetCut 2.0
 Aplikasi NetCut barangkali sudah pernah dengar dengan aplikasi hack-nya. Memang sebenarnya NetCut bukan aplikasi software Hacking, tetapi kebanyakan Software NetCut digunakan untuk melakukan kejahatan, salah satunya untuk mengambil bandwidth disaat orang lain berada di area hotspot, walaupun juga mereka beralasan cuma iseng doang.
Anda yang gemar berinternet di area hotspot tidak perlu kawatir dengan ulah atau kemampuan dan kelebihan NetCut, karena ada penangkal aplikasi NetCut ini yang bisa Anda install dan Anda gunakan ketika merasa khawatir terserang NetCut di area hotspot. Salah satu aplikasi yang bisa untuk menangkal dari serangan NetCut adalah dengan menggunakan Anti NetCut. Dengan Anti NetCut jaringan hotspot yang Anda pakai akanlebih aman, karena jika para orang iseng menggunakan NetCut, Anda sudah siap sedia menangkalnya dengan Anti NetCut.
Untuk download software-nya silahkan klik disini


Subscribe to:
Posts (RSS)